Want to make an appointment with one of our expert plumbers? Get in touch!
Want to learn how to change a shower head? We’re here to help!
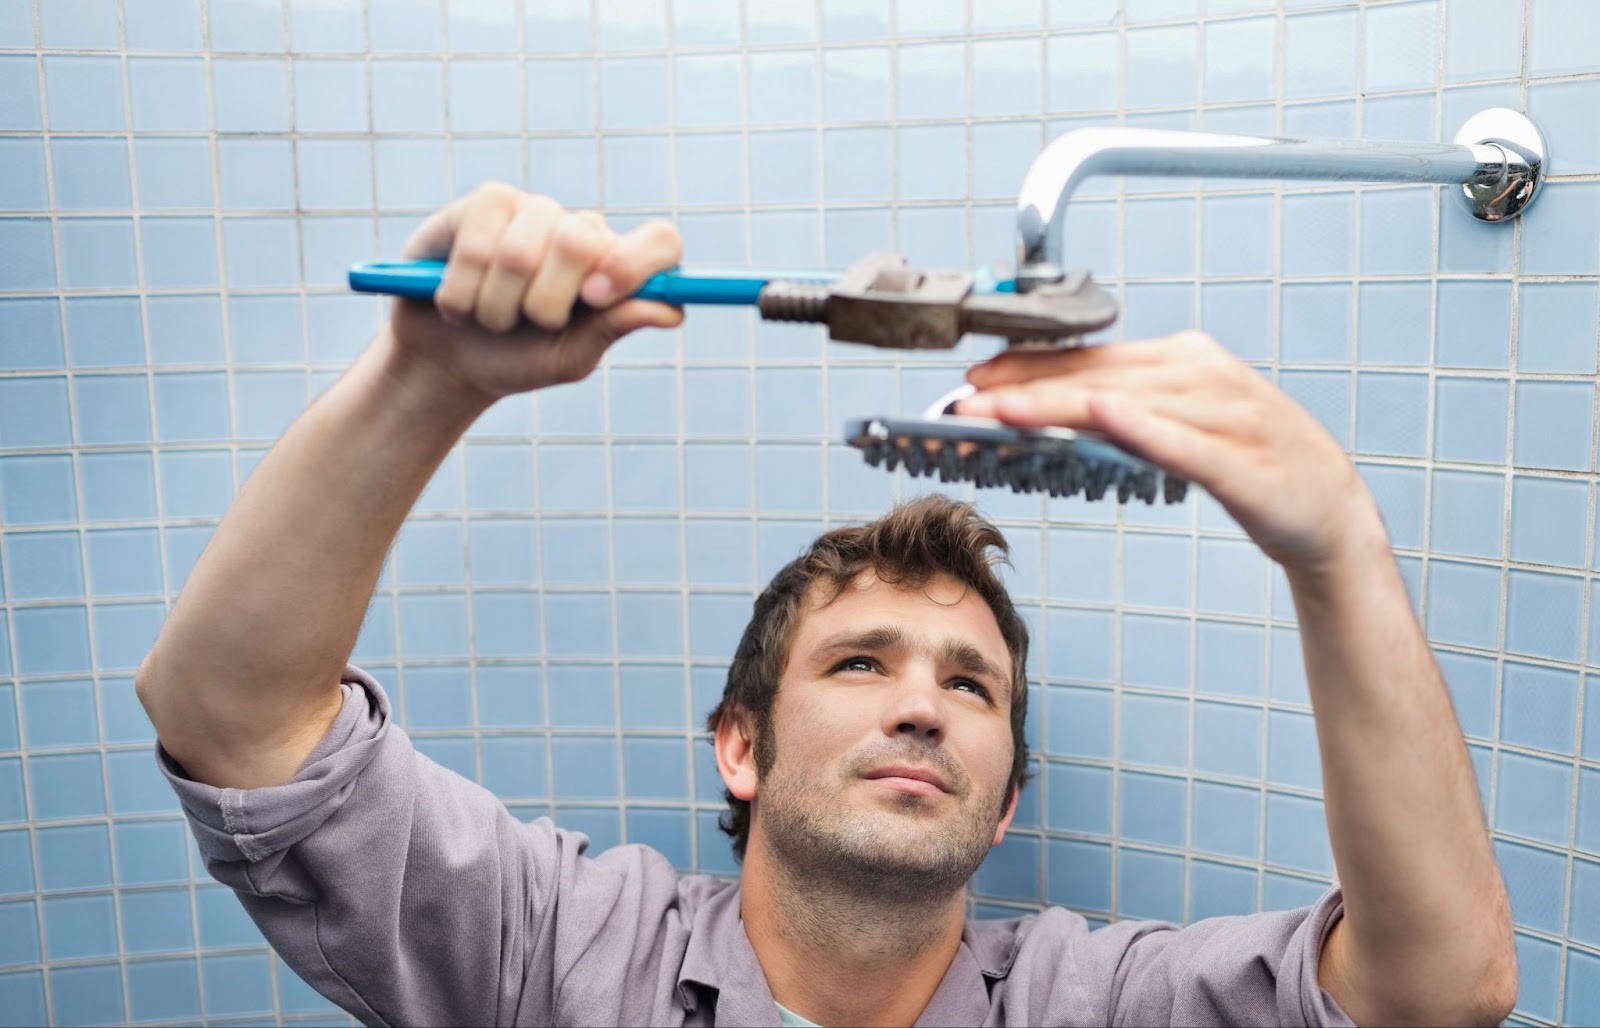
Changing a shower head doesn’t require extensive tools or expertise, and it’s an easy bit of DIY you can do to save water by purchasing a more effective shower head, or to just upgrade to a shower head more in line with your preferences. Whether it’s your first time replacing a shower head or you’re simply seeking a quick refresher, our instructions are there to assist you every step of the way.
DCM Plumbing is a leading plumber on the Gold Coast and blocked drains expert. If you need plumbing services of any kind such as leak detection, burst pipe repairs, or renovations contact us today.
Different Types of Shower Heads
When changing your shower head, you first need to figure out what type of shower head you have. Here are some common types to help you along:
1. Fixed shower heads are common and provide a stable overhead water flow.
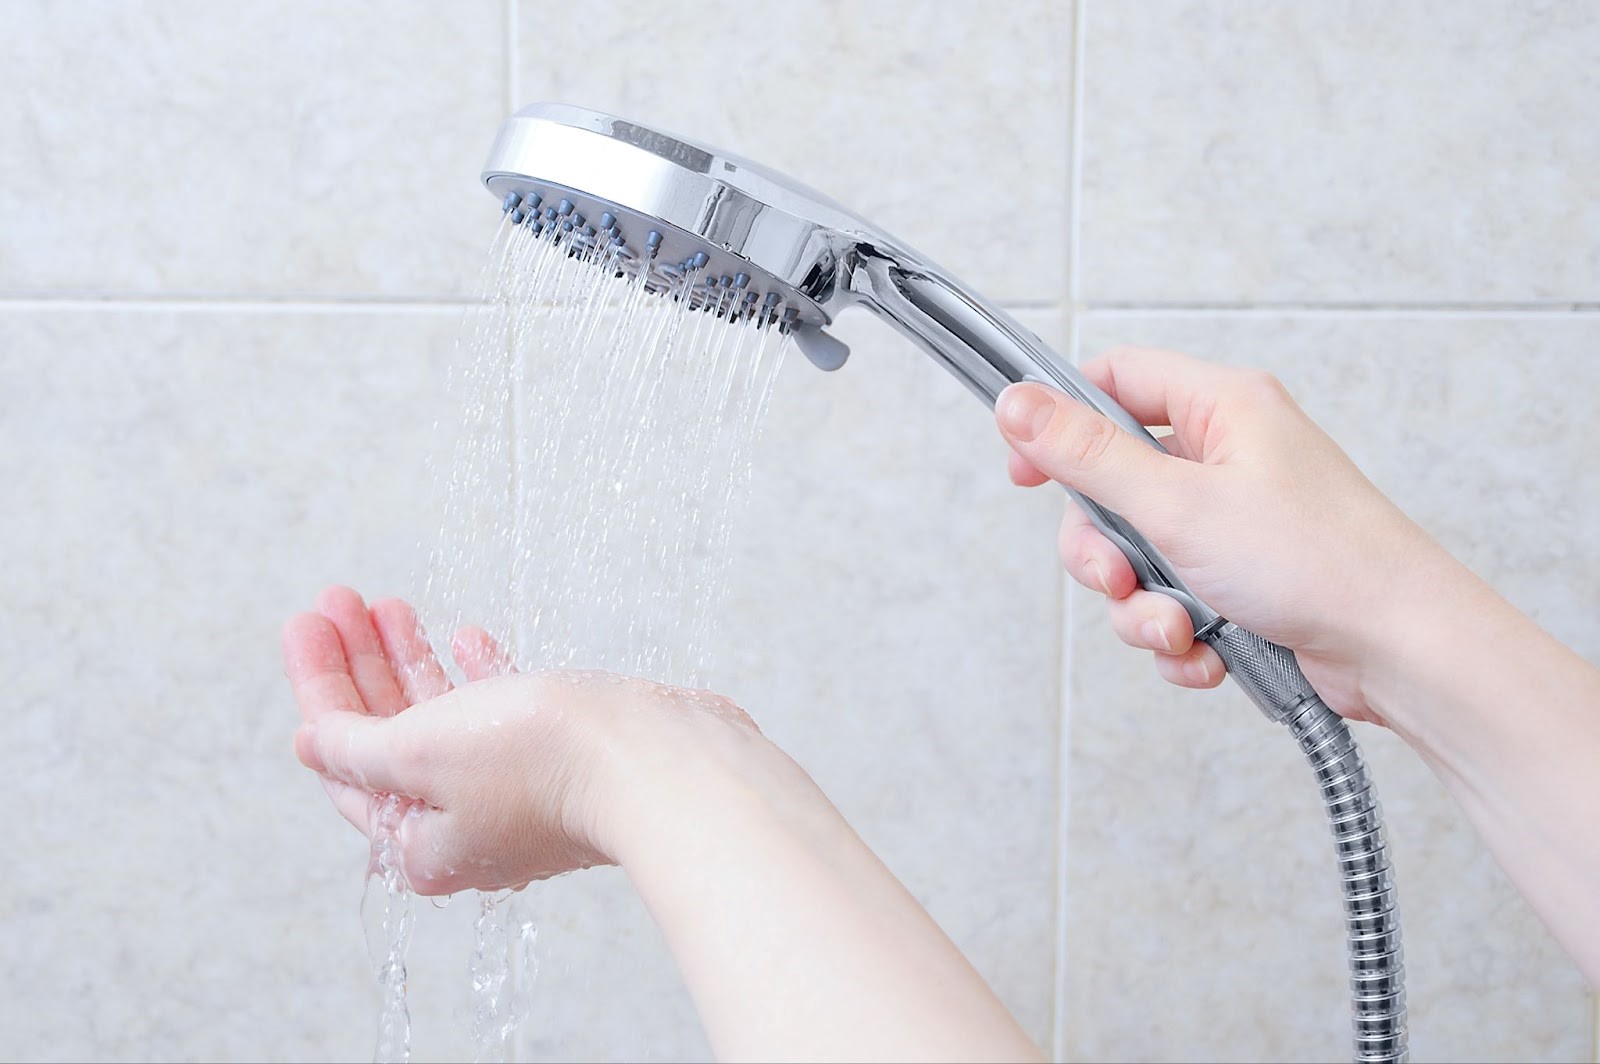
2. Handheld or mixed shower heads offer flexibility, allowing you to direct the water flow where needed, ideal for families with varying height requirements. Just be aware that these types can be more prone to leaks due to the flexi hose and connection.

3. Rain shower heads are designed for a luxury showering experience, mimicking the gentle fall of rain for a soothing effect.
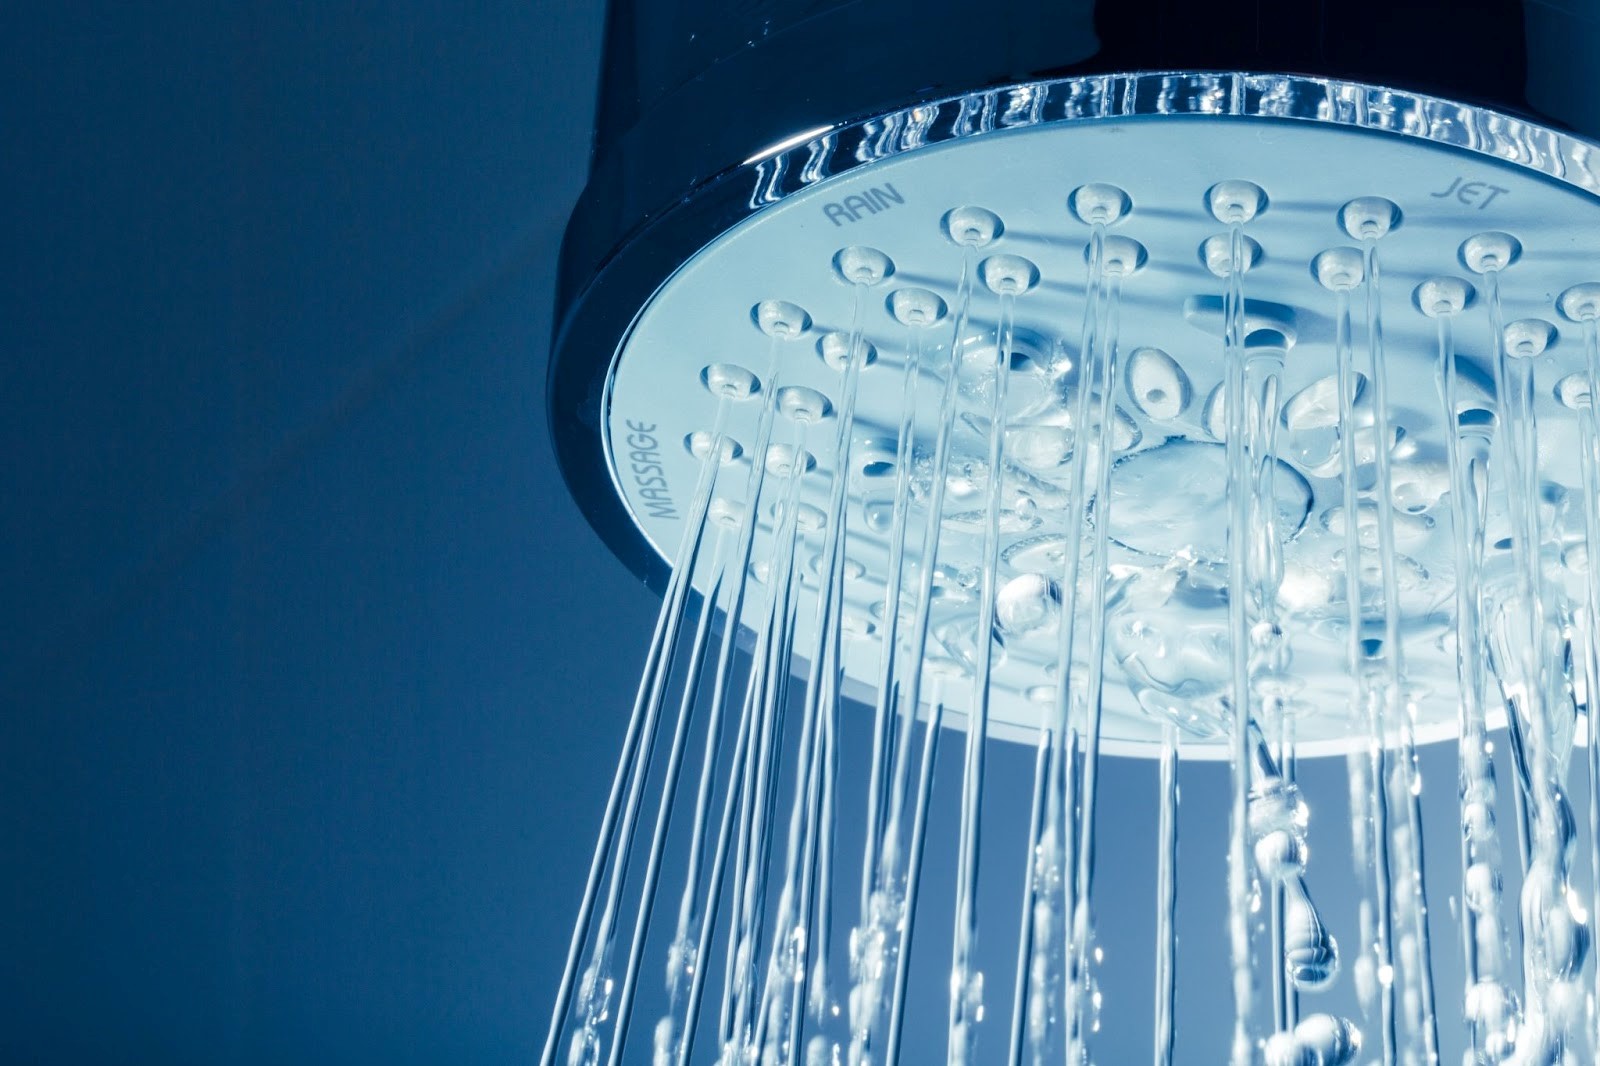
4. High-efficiency shower heads are engineered to reduce water usage without compromising on pressure, catering to eco-conscious consumers.
Tools and Materials You Will Need When Changing a Shower Head
Before you get started, ensure you have the following items:
- Adjustable wrench (shifter spanner)
- Teflon tape (AKA Plumber’s Tape)
- Stool or Ladder
- New Shower Head
- Cloth or Rag
- Bucket and Towels
Step-by-Step Instructions: Replacing Your Shower Head
Removing the Old Shower Head
- Turn off the taps. Ensure your shower taps are turned off completely to prevent any unwanted accidents!
- Protect the finish. Wrap a cloth around the base of the old shower head. This will protect its finish as you unscrew it.
- Loosen and remove. Using the shifter spanner, gently loosen the old shower head by turning it anticlockwise. Once loose, finish unscrewing by hand and remove it.
Preparing the Shower Arm
- Clean the threads. Remove any old Teflon tape or debris from the threads of the shower arm to ensure a clean surface for the new shower head.
- Apply Teflon tape. Wrap new Teflon tape clockwise around the threads of the shower arm. This helps prevent leaks by ensuring a tight seal.
Installing the New Shower Head
- Hand tighten. Position your new shower head onto the shower arm and screw it in by hand, turning clockwise. Ensure it’s straight and securely attached.
- Final tightening. Using your wrench with a cloth to protect the finish, gently tighten the shower head to ensure it’s snug. Avoid over-tightening to prevent damage.
Testing for Leaks
- Turn on the water. Once the new shower head is securely in place, turn the water supply back on.
- Check for leaks. With the water running, inspect the connection between the shower head and the arm for any signs of leaking. If you notice any drips, turn off the water and slightly tighten the connection until the leak stops.
Congratulations, you did it! Your new shower head is ready to enjoy.
Should you ever feel uncertain or face challenges at any point along the way, give our expert team a call and we can put your mind at ease, by ensuring the installation is completed safely and accurately.
Ready for a Plumbing Upgrade?
If you’re feeling inspired after installing your new shower head and are considering further bathroom renovations, DCM Plumbing is here to help. From minor fixes to major overhauls, our expert team is ready to provide you with the best plumbing services on the Gold Coast.
Disclaimer:
While we provide experienced advice on how to replace a shower head, it’s important to remember that these instructions are intended to serve as a general guide. Shower heads can vary significantly in design, functionality, and installation requirements. Therefore, it’s important to check the instructions provided with your new shower head that are tailored to your particular model.
Who invented the toilet? Thomas Crapper, right?
Not exactly.
Although Crapper’s contribution to the modern day toilet is significant, the origins of the toilet are rooted deep in ancient history, predating him by thousands of years. And so it turns out, the title of “he who invented the toilet” cannot be appointed to one single person, since the toilet as we know it today has evolved over thousands of years!
So, Who is the Inventor of the Toilet?
The invention of the toilet is a subject of historical debate. John Harrington is credited with inventing the first flush toilet in 1596, known as the ‘Ajax’. However, it was Alexander Cumming who refined the design in 1775, receiving a patent for a toilet featuring an S-trap that retained water to seal out sewer gases. Cumming’s improvement is considered a crucial development in the evolution of the modern toilet.
So now that we have our frontrunners, let’s take a step back… is a flush really what makes a toilet?

The Earliest Toilets
Let’s take a look at a brief timeline of the advent of the toilet.
Ancient Mesopotamia and Scotland
The dawn of toilet history takes us back an astonishing 5000 to 6000 years, to the cradle of civilization in ancient Mesopotamia, present-day Iraq. Here, the earliest found forms of toilets were simple yet functional, consisting mainly of pits – a far cry from what we know today as the toilet. These rudimentary toilets offered the basic advantage of separating people from their waste, a step in the right direction in terms of public health.
On the other side of the planet, In the far reaches of Northern Scotland, the prehistoric settlement of Skara Brae was on the island of Mainland. Dated to around the same era as the Mesopotamian toilets, there’s a cluster of ten houses that is remarkable for its early plumbing innovation. Each house was equipped with a modest drainage system, connecting to a larger communal conduit that led to the ocean. Here residents practised the earliest form of flushing by pouring water into the drains.
Ancient Greek & Romans Society
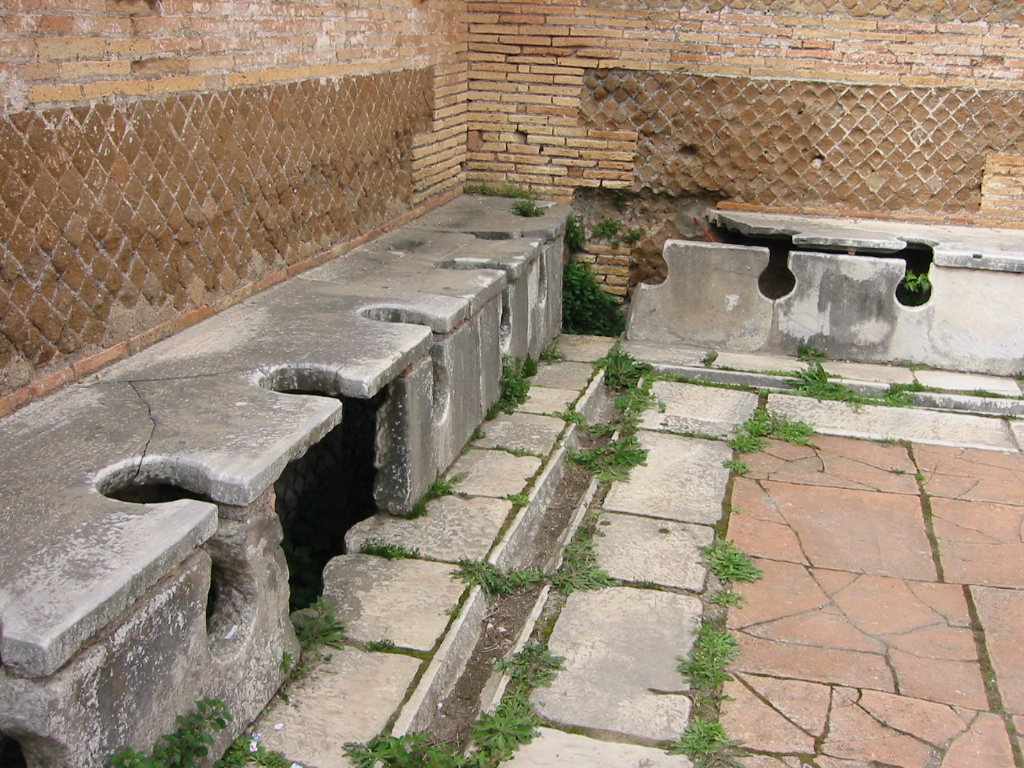
Approximately 2,500 years ago, the era of Classical Greece marked a significant milestone in the history of sanitation with the introduction of public latrines. These communal facilities, more sophisticated than their predecessors, featured large rooms fitted with bench seats strategically positioned above flowing water channels, serving as the early prototypes of public sewer systems. This period also saw the rise of private toilets in the homes of the wealthy, symbolising their status in Greek society.
The latrine development takes an intriguing turn with the Ancient Romans. By the first century BC, over 2,000 years ago, the Romans had embraced and refined the concept of public latrines, drawing inspiration from Greek designs. These Roman versions were more sophisticated, often constructed with stone or wood, featuring benches with strategically placed openings, all perched above efficiently designed sewer systems carrying running water.
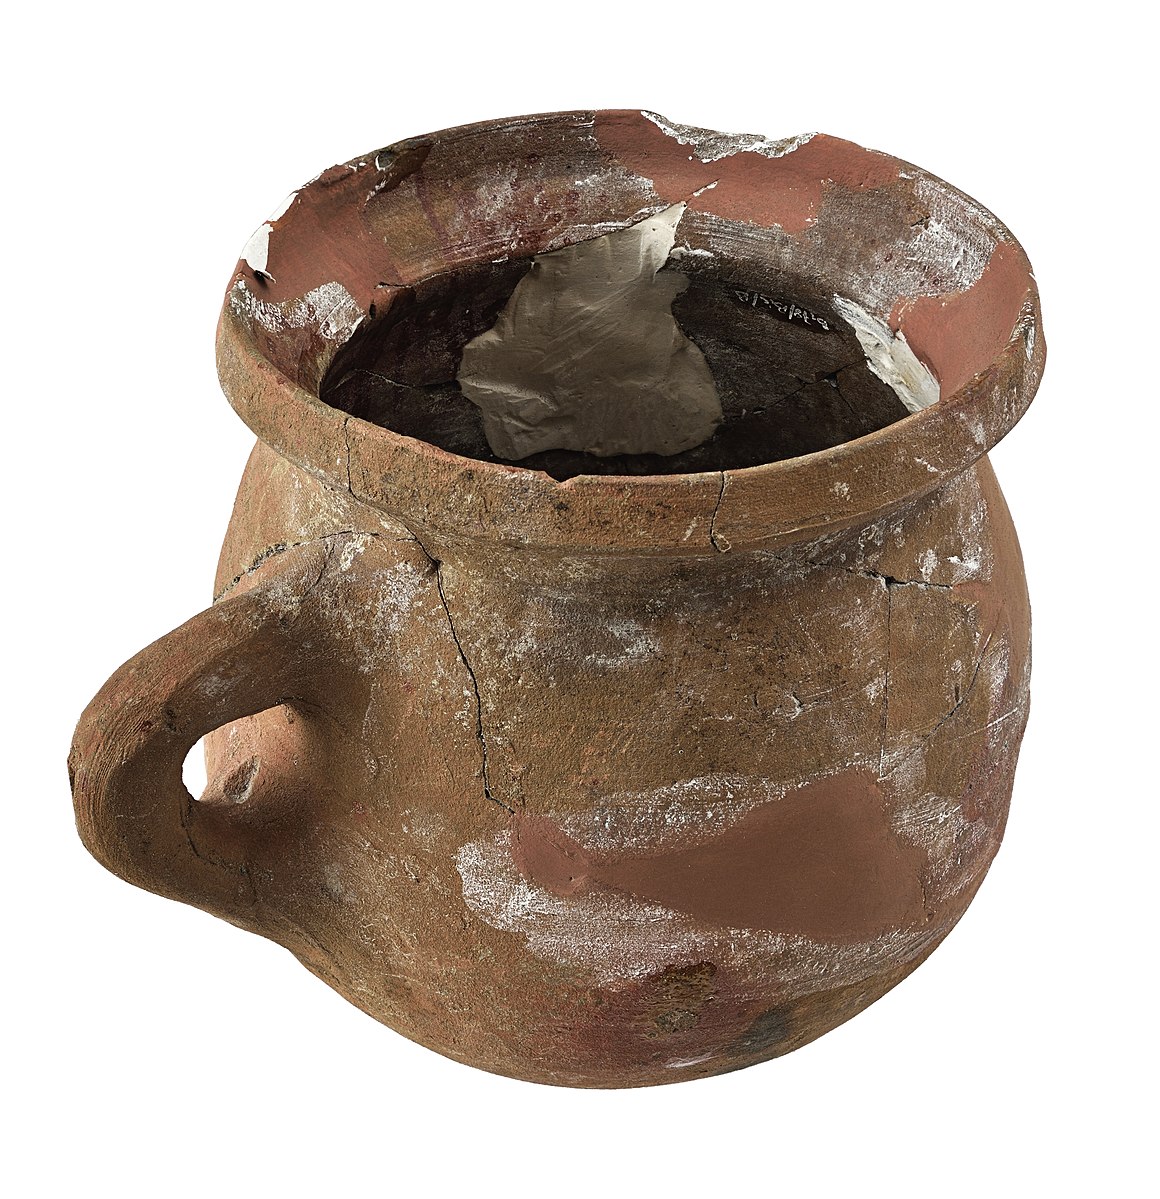
Interestingly, some historical accounts suggest the existence of early types of toilet brushes, offering a glimpse into the Roman approach to cleanliness. However, the luxury of running water remained a public affair, as private toilets in Roman homes were typically just pits used for waste disposal, including food scraps. Once filled, these pits were either emptied into the public sewer or discarded in outlying fields, a practice far from the comfort and convenience of modern toilet plumbing.
The Chamber Pot: A Regression in Toilet Sanitation
After the developments of ancient civilizations, the advancement of plumbing and toilet facilities stalled and even regressed. During the mediaeval period, roughly spanning from 1066 to 1485, the majority of the world population experienced a stark decline in access to the advanced plumbing systems once prevalent in Roman and Greek societies.
This era witnessed a return to more basic methods of waste disposal. The most common practice was the use of chamber pots, which were unceremoniously emptied out of windows, often without regard for passersby below. This unsanitary practice was widespread despite laws attempting to regulate it. Many preferred this method over the physical task of carrying waste to the nearest river, which presented its own set of sanitary challenges.
Contrasting sharply with the commoners of the era, however, the upper class of mediaeval society had the luxury of using ‘garderobes’.
Garderobes
In the mediaeval era, ‘garderobes’ emerged as a unique solution to sanitary needs, particularly among the elite.
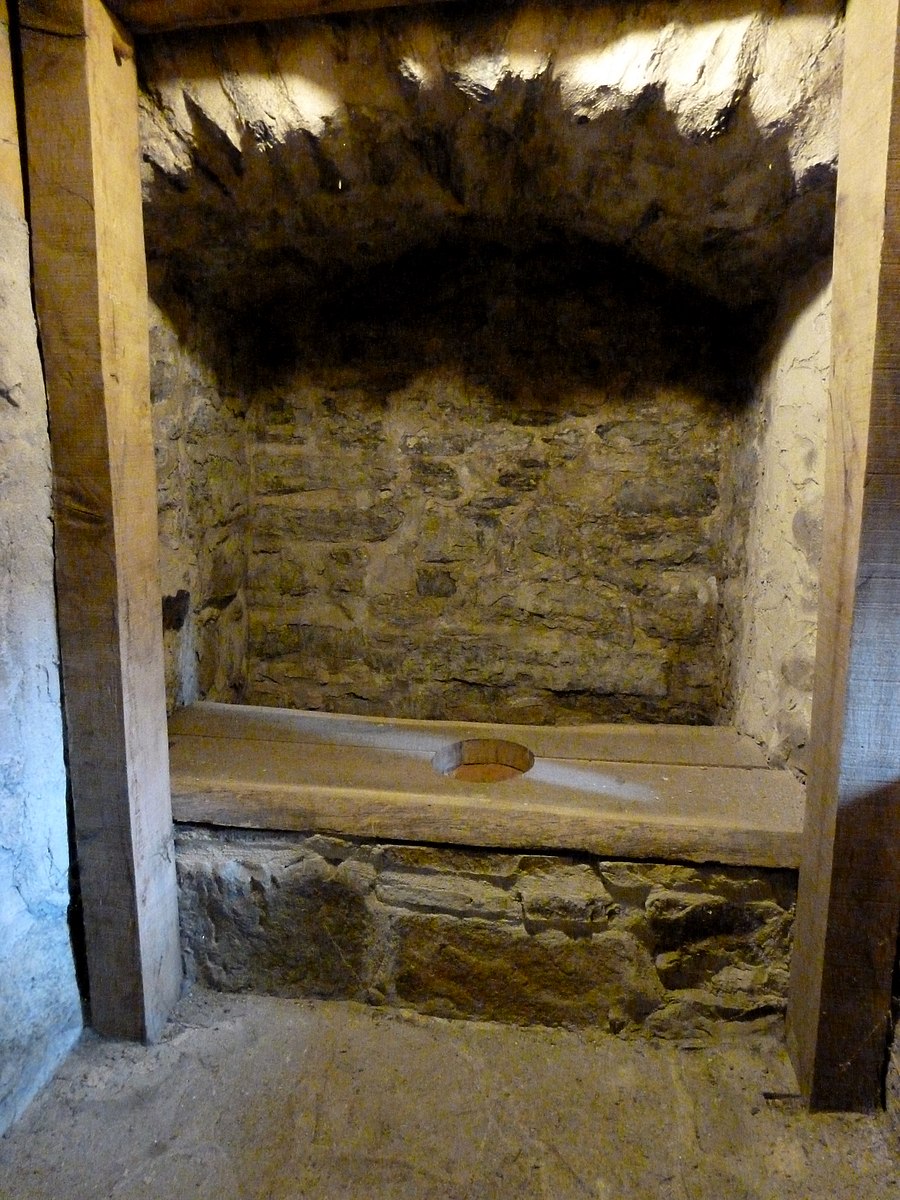
The term ‘garderobe’ derives from the French words ‘garder’ (to keep) and ‘robe’ (clothes). These toilets also served as storage spaces for clothing. The potent odour from human waste and the ammonia in urine were believed to deter fleas, making garderobes an interestingly dual-purpose space.
Garderobes had various names, such as privy, draught, and gong. The maintenance and cleaning of these toilets fell to individuals known as gong farmers. This role, while not highly sought-after, was surprisingly well-paid due to the nature of the work.
In castle design, garderobes were strategically positioned as far from living areas as possible, often equipped with double doors to reduce the spread of any unpleasant smells. They typically featured chutes leading directly to the castle moat, where waste accumulated until removed by the gong farmers.
The Flush Heard Around the World: John Harrington and the Invention of the Flush Toilet

Now, we get back to where we started. In 1592, Harrington – notably the godson of Queen Elizabeth I – engineered a system that was sealed with wax and resin, featuring an upstairs cistern to store water. This early flush toilet released a deluge of 28 litres of water – in contrast, modern flush systems only use 6-9 litres!
Queen Elizabeth I herself showed great enthusiasm for Harrington’s invention, a testament to its novelty and potential. However, this groundbreaking innovation didn’t immediately catch on. It wasn’t until two centuries later in 1775 when Alexander Cumming made crucial improvements to Harrington’s design that the flush toilet became more popular.
The Father of Modern Toilet Plumbing: Alexander Cumming
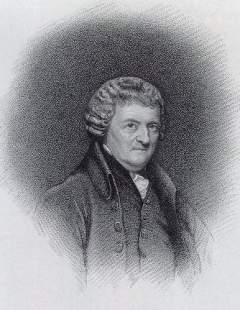
The transition to modern toilets truly began with Alexander Cumming’s innovative S-pipe invention and his patenting of the flush toilet. This design tackled the issue of sewer gas leakage in toilets, which had been a source of unpleasant odours and significant health hazards. The genius of the S-pipe, (or S-trap) lay in its ability to create a water seal within the toilet bowl, blocking sewer gases from entering living spaces.
Cumming’s S-pipe became a catalyst for further innovations in toilet technology. It inspired a wave of inventors to conceive new and improved toilet designs, contributing to the evolution of the toilet as we know it today. Among these inventors was Thomas Crapper, a name often mistakenly credited with the invention of the toilet. Although he did not invent the toilet, Crapper played a big role in popularising it.
Thomas Crapper: Inventor of the Toilet?

Thomas Crapper, born in Yorkshire, England in 1836, carved a niche for himself in plumbing history, not as the inventor of the toilet, but as a significant innovator and marketer in the field. Starting as an apprentice, he rose to become a notable sanitary engineer, eventually establishing the renowned Thomas Crapper & Co. in London, a bathroom product company that is still in operation today.
The Ballcock
Crapper’s most notable invention is the ballcock. This mechanism controlled the water flow into the toilet tank, enhancing the efficiency and reliability of flushing systems. This advancement played a key role in making toilets a standard feature in both public and private spaces.
Crapper was a masterful marketer and promoter. His skillful use of catchy slogans and innovative advertisements greatly popularised indoor plumbing and the use of flush toilets. He was also a pioneer in creating public showrooms for toilets and plumbing fixtures, effectively bringing these topics into the mainstream.
The Future of Toilets
Now that we’ve looked at the past, what of the future? The evolution of toilets is steering towards a future where technology meets sustainability. Visionaries like Bill Gates are working towards high-efficiency, low-cost toilets, particularly aimed at enhancing sanitation in underprivileged areas.
There has been groundbreaking development in toilet technology with the incorporation of health monitoring features. Emerging smart toilets are being equipped with discrete sensors and artificial intelligence capable of analysing waste. This feature promises to offer insights into the user’s health, potentially detecting early signs of illness or assisting in the management of chronic conditions.
Another exciting future for the toilet is the ‘Autarky Toilet‘, developed by researchers at Eawag, the Swiss Federal Institute of Aquatic Science and Technology. This project aims to create a self-sufficient toilet, independent of water and sewer networks. The Autarky Toilet is designed to treat waste on-site, converting it into valuable resources like nutrients for fertiliser.
Your toilet today
Whether it’s installing the latest in toilet technology or providing exceptional plumbing solutions for traditional setups, our team is equipped to handle all your bathroom needs. Embracing both the rich history and the promising future of plumbing, we’re here to ensure that your home’s sanitation systems are not only functional but also contribute to your overall wellbeing and comfort.
Are you on the Gold Coast and ready to upgrade your bathroom with the latest innovations or need expert advice on maintaining your current setup? Reach out to us at DCM Plumbing. Let’s bring the future of toilets and efficient plumbing to your home today!
Drain flies, also known as sewer or sink flies, are teeny-tiny moth-like flies that love damp environments – particularly the drains in your kitchen or bathroom.
Once you notice one in your house, it’s usually only a matter of time until you notice more (lots more), and so getting rid of drain flies quickly and efficiently is vital.
To help you along, we’ve put together 6 tried and true methods to get rid of drain flies once and for all, as well as a few prevention methods and a bit of background to help you understand your not-so-welcome new housemates.
DCM Plumbing is the best plumber on the Gold Coast. We are available 24/7 for all your plumbing needs. With over 900 5* Google reviews and 35 years of experience, we are known as the best for a reason. Got a blocked drain? Need help with leak detection? Want to learn how to clear a blocked drain? We can help.
6 Ways to Get Rid of Drain Flies for Good
Here are our top 6 ways to get rid of drain flies, for good.
1. Regular Drain Cleaning
The first step to getting rid of drain flies is by keeping your sinks and drains clean. A clean drain eliminates the breeding ground for these flies, thereby controlling their multiplication. Use your usual cleaning agents along with a pipe brush to scrub and clean around and inside the drain. This routine cleaning should be performed once a week to prevent the build-up of organic material where drain flies breed.
2. Boiling Water Treatment
A straightforward yet effective method is to pour boiling water down the drain. This simple step can help eliminate drain flies and their larvae. Repeat this process once or twice a week, ensuring you pour the boiling water both down and around the drain to target all potential hiding spots.
3. DIY Drain Cleaner
A homemade drain cleaner solution can also do wonders. Mix equal parts of salt and baking soda (half a cup each), and pour down the drain, then follow with a cup of vinegar. Let it sit overnight. The chemical reaction will not only kill drain flies but also remove any grime or grease that might be acting as a breeding ground. In the morning, pour boiling water down the drain to wash away the residue.
4. Commercial Drain Cleaners
If your drain fly issue persists, consider using commercial drain cleaners such as Drano. These solutions are formulated to clear out the drains and pipes effectively, removing any debris that might serve as a breeding spot for drain flies. Using these products can aid in preventing new eggs from hatching.
5. Apple Cider Vinegar Trap
To deal with adult drain flies, you can create a simple trap using apple cider vinegar. Place a small dish filled with apple cider vinegar covered in plastic wrap near the infested drain. Punch small holes in the plastic wrap to allow the flies to enter but not escape. The flies will be attracted to the vinegar and will get trapped, eliminating them over time.
6. Professional Plumbing Services
Finally, if all else fails, it’s time to call in the professionals. Regular drain cleaning services provided by professional plumbers can effectively prevent drain fly infestations. Plumbers can use tools like water jetters to clear blocked drains and thoroughly clean your pipes. At DCM Plumbing, we offer expert plumbing services on the Gold Coast to help you get rid of drain flies and prevent future infestations.
Remember, if your efforts to eradicate drain flies last longer than 20 days with no success, it’s time to contact professional exterminators or plumbers. As the best Gold Coast plumbers, DCM Plumbing is always ready to help you with your drain fly issues.
What Actually Are Drain Flies?
Drain flies, also known as sink flies, sewer flies, or moth flies, are small, moth-like insects that breed and feed in areas with standing water in the family Psychodidae. As their name suggests, they are commonly found in drains, where a build-up of organic matter provides food and an ideal environment for laying their eggs. They are typically 1.5 to 6 mm long depending on the species, with a fuzzy, moth-like appearance, thanks to a covering of tiny hairs on their wings and bodies.
These insects are known for their ability to reproduce rapidly, with eggs hatching within 48 hours and larvae reaching adulthood in just over a week. Drain flies are capable of laying 30 to 100 eggs at once, which means their populations can grow exponentially in a short time.
While their preferred habitat is within the organic build-up in drains, drain flies can also be found in other moist, decaying environments such as compost piles, garbage bins, or even damp mops and rags.
What Causes Drain Flies?
Drain flies are typically caused by a build-up of organic matter in moist, damp places. They are particularly attracted to stagnant water and the biofilm (or grime) that forms in uncleaned or slow-draining pipes. This includes kitchen and bathroom drains, sewage systems, and even gutters and drainpipes.
Drain flies lay their eggs in this decomposing organic material, providing a food source for the larvae once they hatch. If these conditions persist and are not addressed, a small problem can quickly turn into a full-fledged infestation. Regular cleaning and maintenance of drains are vital to prevent these conditions that attract drain flies.
How to Identify Drain Fly Larvae

Erin Hayes-Pontius, CC BY-SA 3.0, via Wikimedia Commons
Identifying drain fly larvae can be a challenging task due to their small size and the fact that they inhabit hard-to-see places. Drain fly larvae are typically between 4 and 5 mm long, with a characteristic worm-like appearance. They are usually greyish or translucent in colour, which can make them difficult to spot against similar backgrounds.
You’ll most commonly find them in areas where water accumulates for a week or more. This includes seldom-used toilets and sink or floor drains, especially in basements or garages, or in drain pans beneath refrigerators. You might even spot the grey, wriggling larvae swimming in the water.
Drain flies can also breed outdoors during the summer, entering homes through open doors or windows. They thrive in low, wet areas such as those where air conditioning units drain or in clogged guttering. Address these potential breeding sites if the drain flies do not appear to be emerging from inside your home.
Are Drain Flies Harmful?
No, drain flies are not harmful. They do not bite or transmit diseases to humans. However, they can be a nuisance due to their persistent presence once they infest a home. Additionally, a large infestation of drain flies may indicate a problem with drain function or cleanliness.
Are Drain Flies and Fruit Flies the Same?
No, drain flies and fruit flies are not the same. Fruit flies are typically smaller than drain flies and are often seen buzzing around overripe or rotting fruit, fermented goods like beer and wine, and trash cans. They are generally a light yellow to brown colour and have red eyes. Drain flies, on the other hand, prefer damp and wet areas like drains and sewers where they feed and breed on decaying organic material. The two flies have different appearances, preferred habitats, and life cycles.
Keep Your Pipes Drain-Fly-Free with DCM Plumbing
Navigating a drain fly infestation might feel daunting, but armed with the correct knowledge and methods, they can be eradicated effectively. From regular cleaning and homemade remedies to professional plumbing services, the battle against these persistent pests is winnable.
If the issue extends beyond your control, don’t hesitate to reach out to DCM Plumbing. Our experienced team is always available to offer help, providing reliable, efficient services to ensure your home remains drain-fly-free. By staying proactive and addressing the problem at its roots, we can prevent future infestations, keeping your home safe and sanitary. Remember, prevention is always better than a cure!
This article walks you through 5 tried and true methods to unblock your shower drain.
Picture this: It’s been a long day, and all you’re dreaming about is a hot, relaxing shower. You step in, turn on the water, and wait for the magic to happen… but wait, the water’s not draining! Suddenly, you’re standing ankle-deep in murky water, and it’s clear your evening is taking a turn for the worse.
Fear not, a blocked shower drain might not be as bad as it seems. Whatever the cause of your blocked shower drain, we will show you a few different methods to make sure it’s not blocked for long.
5 Ways to Unblock Your Shower Drain
To unblock your shower drain, start with the basics: check your drain for visible obstructions. Hairballs, bobby pins, and chunks of soap. Shine a flashlight into the drain for a closer look, and remove any visible culprits.
If the drain is still stubbornly holding onto water after a preliminary assessment, it’s time to move to the heavy-duty options. You’ve got quite a few tools in your arsenal, so let’s run through them:
- The rubber-gloved hand (or plastic hook): Sometimes, a clog is immediately visible and easily accessible. Put on a sturdy pair of rubber gloves and pull out as much of the clog as you can. You can also use a small plastic hook for this.
- The drain snake: If the clog is playing hard to get, a drain snake can be a game changer. This flexible tool can break up or pull out those stubborn obstructions.
- The boiling water method: If there’s no visible obstruction and the drain snake hasn’t done the trick, try boiling water. Pour boiling water down the drain two or three times to help dissolve any soft build-up such as soap scum.
- The natural drain cleaner: The old volcano experiment also has practical uses. Pour boiling water down the drain to loosen the clog, follow with one cup of baking soda and then one cup of vinegar, and wait 15 minutes. Rinse with more boiling water.
- The plunger method: The classic plunger – an oldie but a goodie. Ensure the plunger cup fully covers the drain opening, add enough water to cover the plunger’s rim, and then plunge away to push the clog through the drain.
Remember, prevention is always better than cure. However, if all your gallant efforts are to no avail, it’s time to pass the baton to the pros. At DCM Plumbing, we’re always here to help, armed with experience and expertise to transform your blocked drain into a free-flowing wonder!
How to Prevent Clogged Shower Drain
Preventing recurring shower drain clogs requires consistent practices and some handy tools. Here are some key strategies to keep your shower drain running freely:
- Use a drain cover or strainer: This is the most straightforward measure you can take. Drain covers or strainers are designed to trap hair and other debris while letting water pass through. Remember to clean it regularly.
- Be mindful of what goes down the drain: Avoid letting large particles, clumps of hair, or pieces of soap go down the drain. The less that enters your pipes, the less chance there is of a clog forming.
- Avoid oil-based products: Oils, whether from natural sources like coconut oil or from commercially-produced bath products, can congeal in the drain and trap other debris, creating a clog. Try to use oil-free products, or be diligent in rinsing the drain after using oils.
- Regular cleaning: Make it a routine to clean your drain every week or two. You can use a natural mixture of vinegar and baking soda, followed by hot water to help break down any budding clogs. This can be particularly effective in dealing with soap scum and minor buildups.
- No dustbin detritus: Resist the urge to rinse off dustbin contents or shake out a rug into the shower. This could lead to an accumulation of larger bits of dirt and debris, exacerbating clog formation.
- Professional maintenance: If your drains constantly clog, it might be worth having a plumber do a routine inspection and maintenance. We have specialised tools to thoroughly unclog pipes and can advise you on other preventative measures to take.
By adhering to these practices, you should significantly reduce the chance of your shower drain clogging. A little prevention can save you from a lot of unclogging in the future! If you live on the Gold Coast and you’ve got a blocked shower drain that you just can’t seem to get rid of, contact us today and we will sort it out for you.
Join us as we look at the fascinating history of plumbing; the good, the bad, and the downright smelly.
Plumbing is an often overlooked and almost universally underappreciated facet of modern life.
Before modern plumbing was invented, many diseases were spread via the improper disposal of human waste as well as contamination of drinking water. In fact, many believe that a key method of transmission of the Black Death – the epidemic that occurred between 1346-1352 and killed one-third of all Europeans at that time – was the improper disposal of bodies in rivers, contaminating water supplies. And if you think that poor plumbing and sanitation stop there, you are sadly mistaken. About 35% of the world population today still has no access to clean and safe toilet facilities – 14% simply still relieve themselves in the open.
Some aspects of the history of plumbing are incredible. Others are warning signs of what might happen should our modern plumbing infrastructure ever fail. As plumbers, we take great pride in doing our part for the community by ensuring that everyone has access to clean water in their homes! Join us as we delve into the nitty-gritty of the history of plumbing.
A Brief History of Plumbing
Let’s take a look at a few of the significant milestones in the history of plumbing.
Water wells: the first examples of plumbing
The history of plumbing is long and complex, but the earliest known examples are generally agreed upon to be water wells.
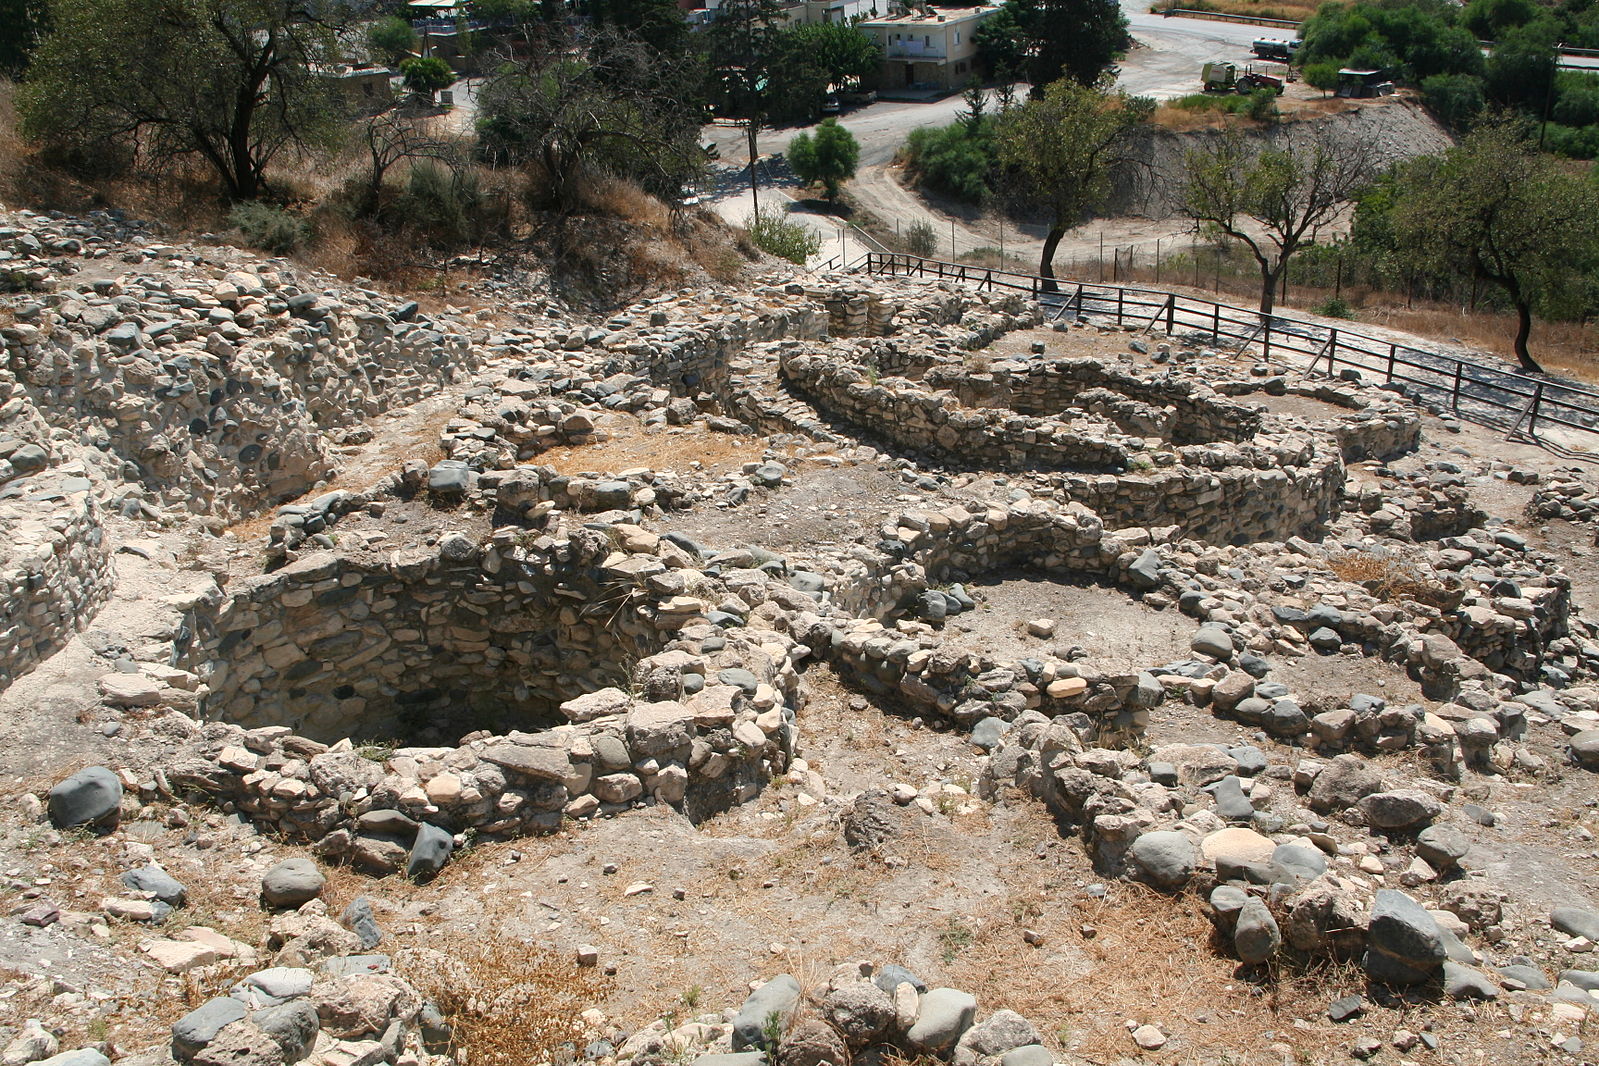
In fact, there are water wells in Cyprus that have been dated back to 7,000-8,500 BC – that’s 9,000 to 10,500 years ago! These marvels of early plumbing were dug straight into the earth and had grooves carved into the side walls in order to allow those constructing them to climb in and out.
The elegant engineering of aqueducts

Aqueducts are one of the key tenets in the history of plumbing. They are an incredible achievement of engineering achieved during the Roman Empire over 2000 years ago. They were used to transport fresh water from sources like lakes and springs to highly populated areas for drinking, irrigation, and public fountains and baths, and are some of the earliest examples of large-scale, complex plumbing.
The Roman aqueduct system was built over the course of 500 years and covered an extensive network across their territories in modern-day France, Spain, Greece, North Africa, and Turkey. Aqueducts were made up of pipes, tunnels, canals, and bridges, which utilised gravity and natural slopes to transport water.
The aqueducts were constructed using public and private funds and high-ranking rulers often had them built. The most recognisable features of the aqueducts are the bridges built with rounded stone arches. Not many aqueducts are still functioning today but the Aqua Virgo, constructed in 19 B.C.E., still supplies water to the famous Trevi Fountain!
Now the next part of plumbing history is one of the most well-documented and important to modern-day life. Let’s take a look at the history of the toilet.
When was the toilet invented?
While many associate the invention of the modern toilet with Thomas Crapper (yes that was his real name and his business is still alive and well today!), the first toilet was invented far earlier – thousands of years earlier in fact.
The first toilets
Some of the earliest examples of toilets were in ancient Mesopotamia around 5000-6000 years ago, in what is modern-day Iraq. These toilets were little more than a pit on which people could sit. While they aren’t quite the porcelain thrones we are accustomed to today, they still would have provided some separation between residents and their waste, potentially reducing the likelihood of the spread of diseases. But they were not very popular, with only around 1 in 5 households in Mesopotamia having access to them!
For another example, we travel to the remote island of Mainland, Northern Scotland. Here lies a settlement known as Skara Brae. This ancient settlement of ten houses features what many believe to be some of the first toilets. Each home had a small drain that fed into a larger system that then ran into the ocean. Residents would flush by pouring a pail of water down their personal drain. And all of this 5000 years ago!
From there we move on to Ancient Greece and Rome where more large-scale toilet plumbing systems have been discovered.
Latrines

In Classical Greece (about 2,500 years ago), we see the first instances of public latrines. These were essentially large rooms with bench seats that sat over the running water of public sewer ways. Around this time we also see more widespread examples of personal toilets in people’s homes (at least, if you were well-off…).
Then, we get to the ancient Romans – these famously innovative people loved a good latrine. In around the first century BC (just over 2,000 years ago), the Romans began adopting large public latrines that were fairly similar to those found in Greece. They were large stone or wood benches with slits cut into them, sitting over public sewer ways with running water. Some believe these ancient toilets even had toilet brushes to help you clear away your mess! Personal toilets did not have the luxury of running water, however, as they were just pits in one’s home. They were also used for getting rid of food scraps and would be emptied into the public sewer system once filled, or dumped in fields out of town.
The next steps
After the development of these somewhat primitive yet remarkably inventive toilets, the world fell into a lull in regard to the advancement of plumbing. In fact, in the mediaeval period (1066-1485), most of the population would have had far less access to toilets with running water than the Romans and Greeks. The most common method of waste disposal in mediaeval times was simply to fill up a chamber pot and chuck it out the window (with or without a cursory glance to check that no one was walking below at the wrong moment!). There were laws put in place to prevent people from doing this, but most would rather slosh it out of the window than walk to the nearest river to dispose of it (which had problems of its own…). Yuck!
The wealthy during the mediaeval period made use of what are known as ‘garderobes’.
Garderobes
The word “garderobe” comes from the French word ‘garder,’ meaning to keep, and ‘robe’ as in clothes. Garderobes were medieval toilets that were also used to store clothes, as the strong smells from human waste and the ammonia from urine helped keep fleas away (a nice medieval life hack for you!).
Garderobes had several alternative names, such as privy, draught, and gong. The people responsible for cleaning and emptying the waste produced by garderobes were called gong farmers – and they were quite well paid for the work.
Garderobes were kept as far away from living spaces as possible, often with double doors to reduce the smell. Chutes often led to the castle moat for the waste to accumulate for the gong farmers to clean. Iron bars were eventually added to prevent attackers from entering the castle through these chutes (imagine being the first to find out these bars were necessary!).
The first toilet flush
The first flushable toilet was invented in 1592 by Sir John Harrington, godson to Queen Elizabeth I. This mechanism was made watertight with wax and resin, while an upstairs cistern contained the water. When the flush would activate, it would release around 28 litres of water (that’s a lot – modern flushes only use around 6-9 litres).
While Queen Elizabeth herself was quite enthusiastic about the mechanism, the technology remained mostly dormant until 200 years later when Alexander Cummings improved upon the design and patented the first flushing toilet, while also inventing the S-pipe.
The modern toilet
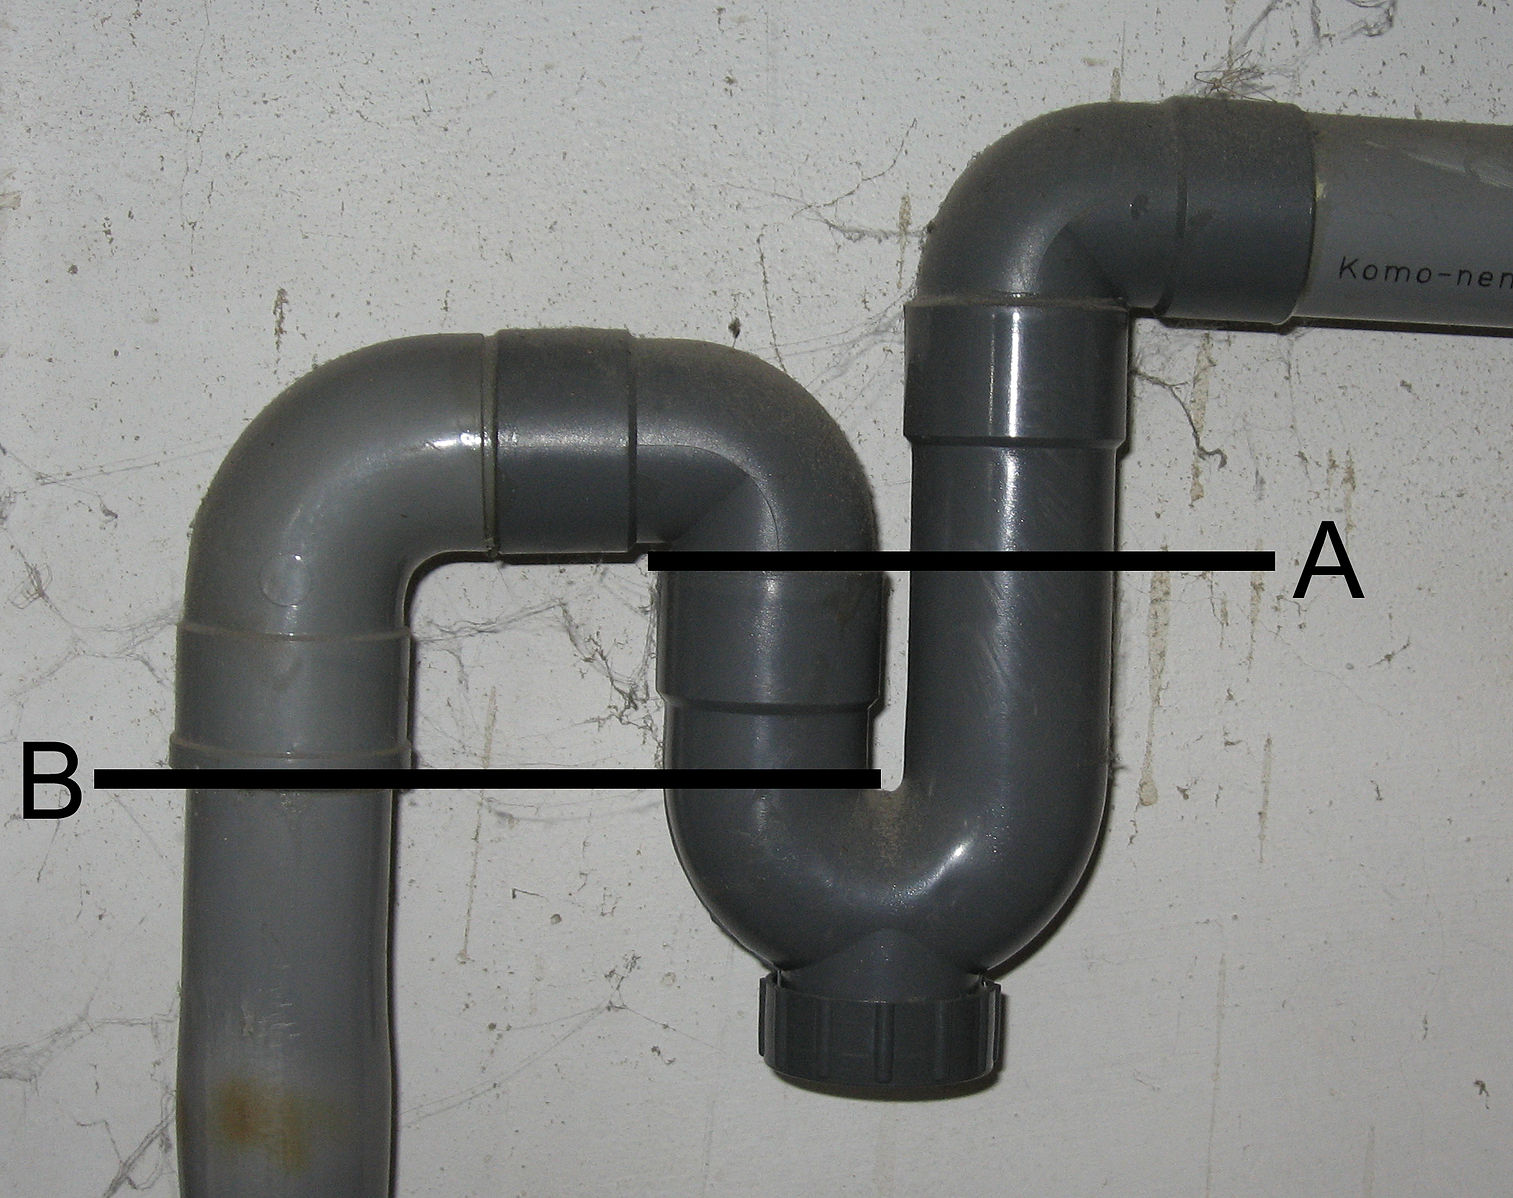
The invention of the S-pipe and patenting of a flushing toilet by Alexander Cumming was a game-changer in the history of sanitation and public health. Before its invention, sewer gas would often escape through toilets, causing unpleasant smells and health hazards. The S-pipe, also known as the “S-trap,” solved this problem by creating a water seal that prevented sewer gas from entering and escaping the toilet bowl. This innovation had significant implications for public health, as it reduced the spread of water-borne diseases and improved overall sanitation.
The S-pipe also paved the way for further advancements in toilet technology. It inspired other inventors to create new and improved toilet designs, one being none other than Thomas Crapper.
While the influence Thomas Crapper had on the development of the modern toilet is often overstated (he did not invent it), he certainly revolutionised the way we think of the toilet.
Thomas Crapper: innovator or full of crap?
Thomas Crapper was born in 1836 in Yorkshire, England. Crapper started his career as an apprentice plumber, then became a sanitary engineer, and finally established his plumbing business in London in the late 1800s. His company, known as Thomas Crapper & Co., was one of the most prominent plumbing firms of the time and was responsible for many of the plumbing innovations that we take for granted today.
Crapper’s most significant contribution to the world of plumbing was his development of the ballcock, a device that regulates the flow of water into a toilet tank. This invention made it possible to create a more efficient and reliable flushing system, leading to the more widespread use of toilets in both public and private settings.
In addition to his technical innovations, Crapper was also a skilled marketer and promoter of his products. He was known for his catchy slogans and advertisements, which helped to popularise the use of indoor plumbing and flush toilets. He was also one of the first to create showrooms for toilets and other home plumbing fixtures, bringing the toilet from something that no one really wanted to talk about into the open.
While the popular myth that he invented the toilet is not true, his legacy lives on as a symbol of the importance of good plumbing and sanitation in the modern world.
The toilets of the future?
The future of toilets is looking smart, with a range of innovative designs in the works. Bill Gates has been advocating for low-cost, high-efficiency toilets to bring effective sanitation to impoverished areas, others are focused on high-tech toilets for home use that pamper users with amenities such as heated seats and built-in bidets.
Some smart toilets are even being designed to offer a window into the health of the people who use them, with discrete sensors and artificial intelligence analysing waste to detect early signs of disease or help people manage chronic conditions.
The challenges to developing and marketing smart toilets include ensuring reliability, ease of use, and privacy protection. However, advocates believe that consumers will embrace smart toilets once they realise the benefits they offer for their health and well-being.
Modern plumbing saves lives: John Snow and the cholera outbreaks of London
Cholera is a bacterial infection caused by the bacterium Vibrio cholerae. The infection causes severe diarrhoea and vomiting, which can lead to dehydration and death if left untreated. Cholera can spread rapidly in areas with inadequate sanitation and poor plumbing infrastructure and can cause large outbreaks and epidemics.
The cholera outbreaks of London in the 19th century were caused by contaminated water, but it took a long time for the medical community to accept this theory. These outbreaks claimed 10,000 lives in London alone.
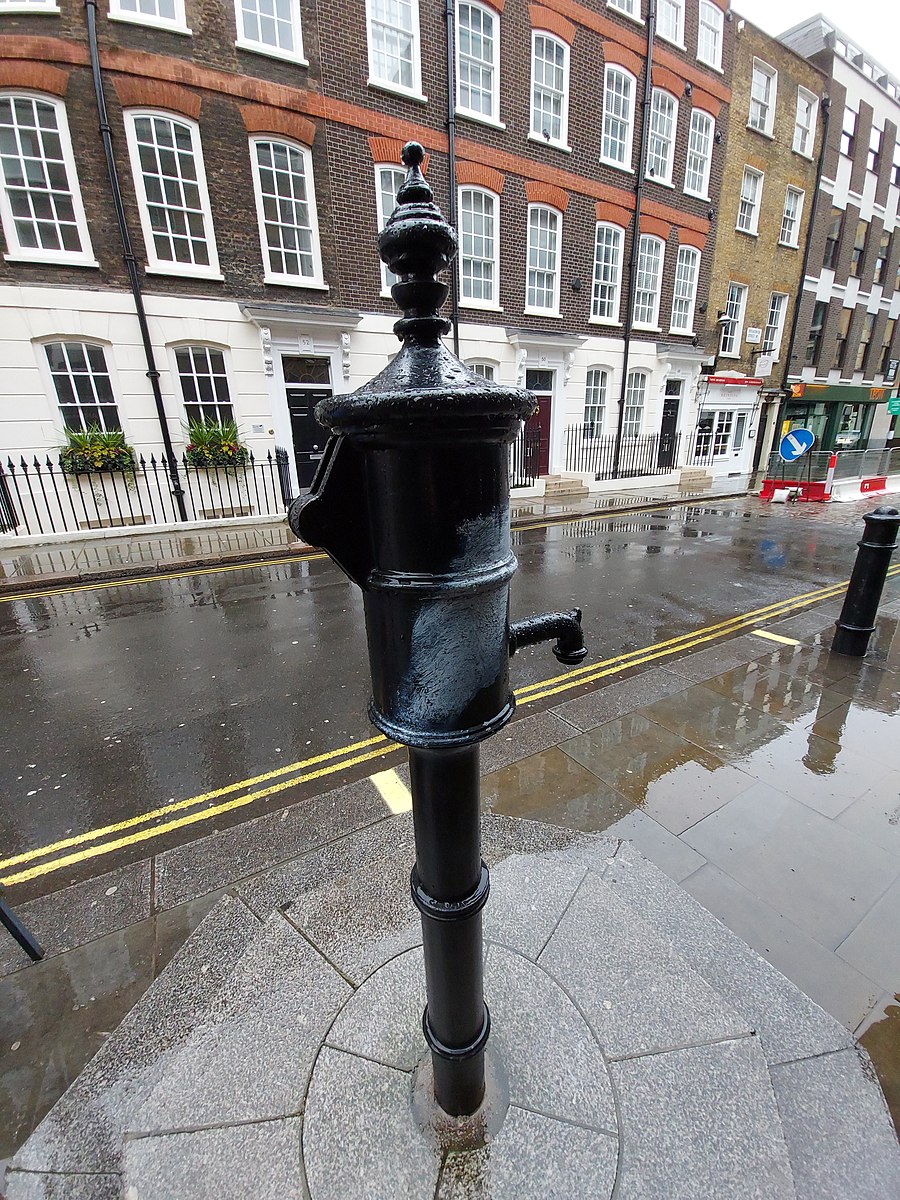
Dr. John Snow, an obstetrician, was one of the first to suggest that water contaminated by sewage was the cause of cholera, but his theory was not widely accepted. In 1854, a cholera outbreak in Soho killed 616 people, and Dr. Snow was able to use his research to prove that contaminated water from the Broad Street pump was the source of the epidemic. The origin was supposedly from a woman washing a nappy in the drinking water!
Despite his success in stemming the outbreak, public officials were slow to act on his findings. It was only years later that a German physician, Robert Koch, isolated the bacterium Vibrio cholerae, which confirmed Snow’s theory. Today, Snow is considered the pioneer of public health research and his theories are still used by epidemiologists to track the sources and causes of diseases. This is a problem that modern plumbing has helped solve (thankfully!), yet there are still 1.3 to 4 million cases of cholera each year in poorer countries due to contaminated drinking water.
Contact DCM Plumbing for all your plumbing needs on the Gold Coast
We hope you enjoyed our little history lesson on plumbing! While plumbing may seem like a mundane aspect of modern life, its history is a testament to the ingenuity and resourcefulness of our ancestors. As we continue to face new challenges and opportunities, plumbing will undoubtedly continue to evolve and play a vital role in our lives.
At DCM Plumbing, we are always here to help with any plumbing concerns on the Gold Coast, including blocked drains and leak detection. If you experience any issues or need professional advice, don’t hesitate to reach out. Contact us today.
In this guide, we delve into the world of plumbing fixtures. Whether you’re a homeowner looking to update or simply curious about the nitty-gritty of these essential home fixtures, we’ve got you covered.
DCM Plumbing is the best plumber on the Gold Coast. We are available 24/7 for all your plumbing needs. With over 900 5* Google reviews and 35 years of experience, we are known as the best for a reason. Got a blocked drain? Need help with leak detection? Want to learn how to clear a blocked drain? We can help.
What are fixtures in plumbing?
Plumbing fixtures are devices or components that are connected to a plumbing system to deliver and drain water. They serve various purposes in residential, commercial, and industrial settings, such as providing water for drinking, washing, bathing, and waste disposal.
The types of plumbing fixtures
The types of plumbing fixtures in your home include:
- Taps: These control the flow of water from pipes and are found in sinks, showers, bathtubs, and outdoor spigots
- Sinks and basins: These are basins that hold water for washing hands, dishes, and other items. Sinks are commonly found in kitchens, bathrooms, and laundry rooms.
- Toilets: These fixtures are designed for human waste disposal and are connected to sewer or septic systems.
- Bathtubs and showers: These fixtures provide a space for bathing or showering, with bathtubs usually having a built-in or separate faucet, while showers have a shower head connected to a water source.
- Bidets: These are used for washing oneself after using the toilet, and they typically have a tap or nozzle for delivering water.
- Spigots: These outdoor taps allow for the connection of garden hoses and are used for tasks like watering lawns, washing cars, or filling pools.
- Water heaters: Although not a fixture itself, water heaters supply hot water to various plumbing fixtures like taps, showers, and bathtubs.
- Traps, drains, and food waste disposers: These are essential components of a plumbing system that help to remove wastewater, dispose of food waste, and prevent sewer gases from entering a building.
These fixtures are typically made from materials such as porcelain, stainless steel, brass, or plastic, and they come in a wide range of styles and designs to suit different needs and preferences.
How to choose plumbing fixtures
When looking at how to choose plumbing fixtures for your home, there are many factors to consider. These factors will help you make informed decisions and ensure that your home’s plumbing system functions efficiently and effectively.
- Functionality: Choose fixtures that meet your specific needs and preferences. For example, if you have limited mobility or accessibility concerns, consider installing grab rails, walk-in bathtubs, flick mixer taps or touchless taps.
- Quality and durability: Opt for high-quality, durable fixtures that are less likely to wear out, leak, or break over time. Investing in reputable brands and materials can save you money in the long run by reducing the need for repairs or replacements.
- Compatibility: Ensure that the new fixtures are compatible with your existing plumbing system. This may involve checking pipe sizes, connections, water pressure requirements, and other specifications.
- Style and design: Select fixtures that complement the overall aesthetic of your home, taking into account the style, colour, and finish. Coordinating fixtures throughout your home can create a cohesive look and enhance your home’s appeal.
- Energy and water efficiency: Choose fixtures with water-saving features, such as low-flow taps, showerheads, and dual-flush toilets. These can help you conserve water and reduce your utility bills.
- Installation: Consider the complexity of installation for the new fixtures. Some updates may require the expertise of a professional plumber, while others can be completed as DIY projects.
- Budget: Establish a budget for your plumbing updates and prioritise which fixtures to replace based on factors such as age, condition, and impact on water usage.
- Local building codes and regulations: Familiarise yourself with any local building codes or regulations that may apply to your plumbing updates, as these can dictate specific requirements for fixture types, installation, and more.
- Warranty and support: Check the warranty provided by the manufacturer for the fixtures you plan to purchase. A good warranty can offer peace of mind and protect your investment in case of defects or issues.
By considering these factors, you can make informed decisions about updating your plumbing fixtures and ensure a successful, efficient, and aesthetically pleasing outcome.
Contact DCM Plumbing if you’re in doubt
If you’re not sure how to install your new plumbing fixtures, contact us today. We are the Gold Coast’s best plumbers with over 900 5* Google reviews and 35 years of experience and we can help you with all your plumbing maintenance needs.
In this article, we look at how to dispose of cooking oil and other fats properly, why you can’t pour them down the sink, and more.
Is there anything better than fried foods? Probably not, but disposing of cooking oil properly is a lot less enjoyable…
While you might’ve heard that you shouldn’t pour oil down the sink, have you ever thought about why you shouldn’t? Well, we are going to show you the why, detail the shocking damage that fat and oil can cause in your pipes and further afield, and demonstrate how to dispose of oil properly.
DCM Plumbing is the best plumber on the Gold Coast. We are available 24/7 for all your plumbing needs. With over 900 5* Google reviews and 35 years of experience, we are known as the best for a reason. Got a blocked drain? Need help with leak detection? Want to learn how to clear a blocked drain? We can help.
Can you pour oil down the sink?
Plainly, no, you can’t pour oil down the sink. This is also true for other fats like lard and butter. Pouring fats, oil, and grease down your sink can cause significant damage to your pipes, the sewerage, and even the wider environment. Don’t do it! Let’s look at the why a little more closely now.
Why can’t you put oil down the sink?
- It can clog your drains: Fats, oils, and grease thicken and can even solidify when they cool down (especially in the cooler months). When poured down the sink, they can stick to the pipes and accumulate over time, eventually forming blockages. This can lead to slow-draining water, foul odours, and even sewage backups.
- Sewer system damage: When fats, oils, and grease build up in the sewer lines, it can cause blockages that affect the entire system, leading to possible overflows and environmental damage.
- Environmental pollution: When blockages in the sewer system cause overflows, untreated sewage can enter waterways, affecting aquatic life and contaminating water sources. Fat, oil, and grease-related pollution can be harmful to the environment and pose health risks to humans and wildlife.
Plumbing damage: Fats, oils, and gas can cause damage to your home’s plumbing system, resulting in costly repairs and potential water damage.
Fatbergs: nightmares lurking in the sewers

A fatberg is a large, solid mass formed in sewer systems when fats, oils, and grease combine with non-biodegradable items like wet wipes, nappies, sanitary products, and other debris.
Fatbergs can cause serious problems in sewer systems, including blockages, sewage overflows, and damage to infrastructure. They are difficult and expensive to remove, often requiring specialised equipment and manual labour.
In fact, a fatberg in London made headline news in 2017 as it was so severe that it risked flooding London streets with raw sewage. The fatberg required an entire team of workers in specialised protective suits to dismantle it with shovels, and they described it as being as hard as concrete. The fatberg was over 250 metres long and weighed as much as 19 elephants. This fatberg was so notorious in fact that after dismantling it, part of it was put on display at the Museum of London, a documentary was made about it, and it even inspired a musical.
While it’s easy to have a laugh at some of the more extraordinary stories that fatbergs produce, Water Services Association of Australia estimates that fatbergs cost water utility companies an estimated $15 million a year to clear – that’s serious money.
Don’t be a part of the problem! Do your part and dispose of fat, oil, and grease responsibly.
How to Dispose of Cooking Oil Properly
Container method:
- Allow the cooking oil to cool: After using the oil, wait for it to cool down to a safe temperature before handling it.
- Choose a suitable container: Find a solid, sealable, container that is large enough to hold the oil. Old jars or plastic containers with lids, such as empty detergent or milk bottles, are great options as they help to reuse waste.
- Pour the oil into the container: Carefully pour the cooled oil into the container, using a funnel if necessary to avoid spills. If you have used solid fats, allow them to solidify, then scoop them into the container.
- Seal the container: Secure the lid tightly to prevent leaks and odours.
- Throw the sealed container into your general waste: Ensure the container is sealed before throwing it in the bin, and then simply get rid of it like normal waste.
If you work at a cafe, bar, or restaurant, there may be an oil recycling service near you.
Alternative disposal methods
If you don’t have a container to dispose of the oil in, there are other ways to get rid of small amounts of oil.
To do this, ensure the oil is cooled (and solidified if applicable), then mix it with absorbent materials such as paper towels or cat litter before placing it in a sealed bag and disposing of it in your general waste bin. Note that this method should only be used for small amounts of oil, as larger quantities may cause issues at waste processing facilities.
Add small amounts to your compost
Small amounts of used cooking oil can be added to a compost pile (try and limit yourself to about a cup at a time). If you do choose to add used cooking oil to your compost, make sure to mix it thoroughly with other organic matter, such as yard waste and kitchen scraps, to help prevent clumping and promote even decomposition. Adding too much oil to your compost can slow down the composting process, and too much oil can make your compost start to smell.
Reuse your cooking oil
You can also filter the cooled oil through a fine mesh strainer or cloth to remove any food particles, and store it in a clean container for future use. Reusing oil is best for oils with a high smoke point, such as vegetable or canola oil, and when it hasn’t been used to cook strong-flavoured or heavily seasoned foods. Only reuse once or twice, maximum.
Contact DCM Plumbing for all your plumbing needs
At DCM Plumbing, we are always here to help with any plumbing concerns, including blocked drains and pipe maintenance. If you experience any issues or need professional advice, don’t hesitate to reach out. Contact us today.
So you’ve just bought a nice new ice maker/filtered water fridge and you want to learn how to plumb it. Well, you’re in safe hands! At DCM Plumbing we’ve plumbed a few fridges in our time and while we can show you how to plumb yours, it’s almost always best left to the professionals, especially if the water supply isn’t nearby – it’s not as straightforward as it sounds.
DCM Plumbing is the best plumber on the Gold Coast. We are available 24/7 for all your plumbing needs. With over 900 5* Google reviews and 35 years of experience, we are known as the best for a reason. Got a blocked drain? Need help with leak detection? Want to learn how to clear a blocked drain? We can help.
Can you plumb a fridge yourself?
Well, unfortunately – and perhaps surprisingly – not really. In Queensland, there are strict regulations on who can perform plumbing work and plumbing a fridge yourself can not only void the warranty of your fridge but also cause insurance claim issues if any problems were to arise, so best leave it to a professional.
In fact, in a worst-case scenario, you could be looking at penalties for breaching plumbing law, going so far as prosecution in court and on-the-spot fines.
If after reading all that you’d still like to plumb it yourself, we’d be remiss in not giving you the best chance of success, but be warned. Here is how to plumb in a fridge:
How to plumb in a fridge
Here is a six-step process that will walk you through how to plumb in a fridge yourself:
- First, shut off the water supply by turning off the valve that provides water to the sink. Then, look under the sink and locate where it is connected to the waterline.
- Insert a T-shaped valve, dividing the waterline into two separate connections. One connection will supply water to the sink and the other will be used for the fridge freezer. If the water tap is directly connected to the waterline, remove the tap and connect the T-shaped valve over it.
- Connect one end of the valve to the waterline and the other end to the sink or water tap. In the centre, there will be a hole left where you can attach the piping for the fridge.
- Secure the pipe with an O ring and connect the braided water supply tube to the valve. If the waterline goes under the sink, you might need to drill a hole in the cabinet to let it pass through to the sink.
- Finally, connect the pipe to the refrigerator by pushing the other end of the pipe onto the connection at the back of the freezer and securing it with an O ring. Use tape for extra security before pushing the fridge into position.
- Turn the water supply back on, and let the water flow into the fridge’s inbuilt water tank. Test the water dispenser by flushing 8-10 glasses of water through it and check for leaks in the pipework.
If that sounds like too much work for you or your fridge doesn’t have a handy water supply next to it, then leave it to a professional. If you’re on the Gold Coast, contact us today and we will be more than happy to plumb your fridge for you. Don’t risk it!
This post will discuss the steps you can take to fix a leaking toilet or cistern.
A leaking toilet or cistern can be a frustrating problem, but the good news is that it is often a simple issue that can be resolved with a few basic tools and a bit of know-how. Whether you’re dealing with a slow drip or a steady stream of water, we’ll walk you through the process of identifying the cause of the leak and provide solutions to fix it. So, if you’re tired of dealing with a constantly running or leaking toilet, read on to learn how to fix the problem once and for all!
DCM Plumbing is the best plumber on the Gold Coast. We are available 24/7 for all your plumbing needs. With over 900 5* Google reviews and 35 years of experience, we are known as the best for a reason. Got a blocked drain? Need help with leak detection? Want to learn how to clear a blocked drain? We can help.
Why does my toilet keep leaking?
A leaking toilet or cistern can be caused by several common issues such as:
- malfunctioning inlet/fill valve
- loose or worn flushing mechanism/outlet valve
- a cracked or damaged cistern or bowl
- poor installation
- a blocked or clogged toilet
In order to fix a leaking toilet or cistern we need to first identify where the problem is coming from.
How to fix your running/leaking toilet or cistern
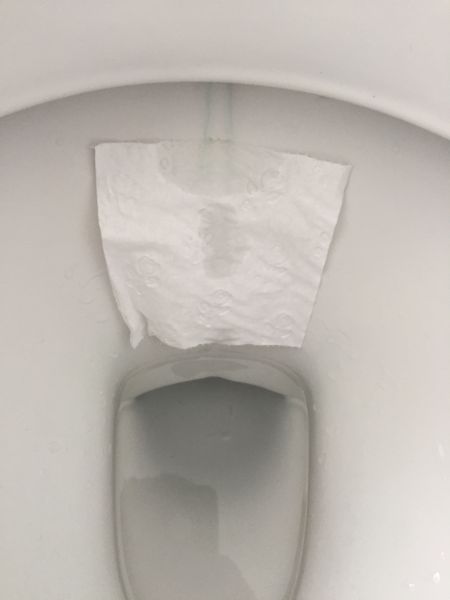
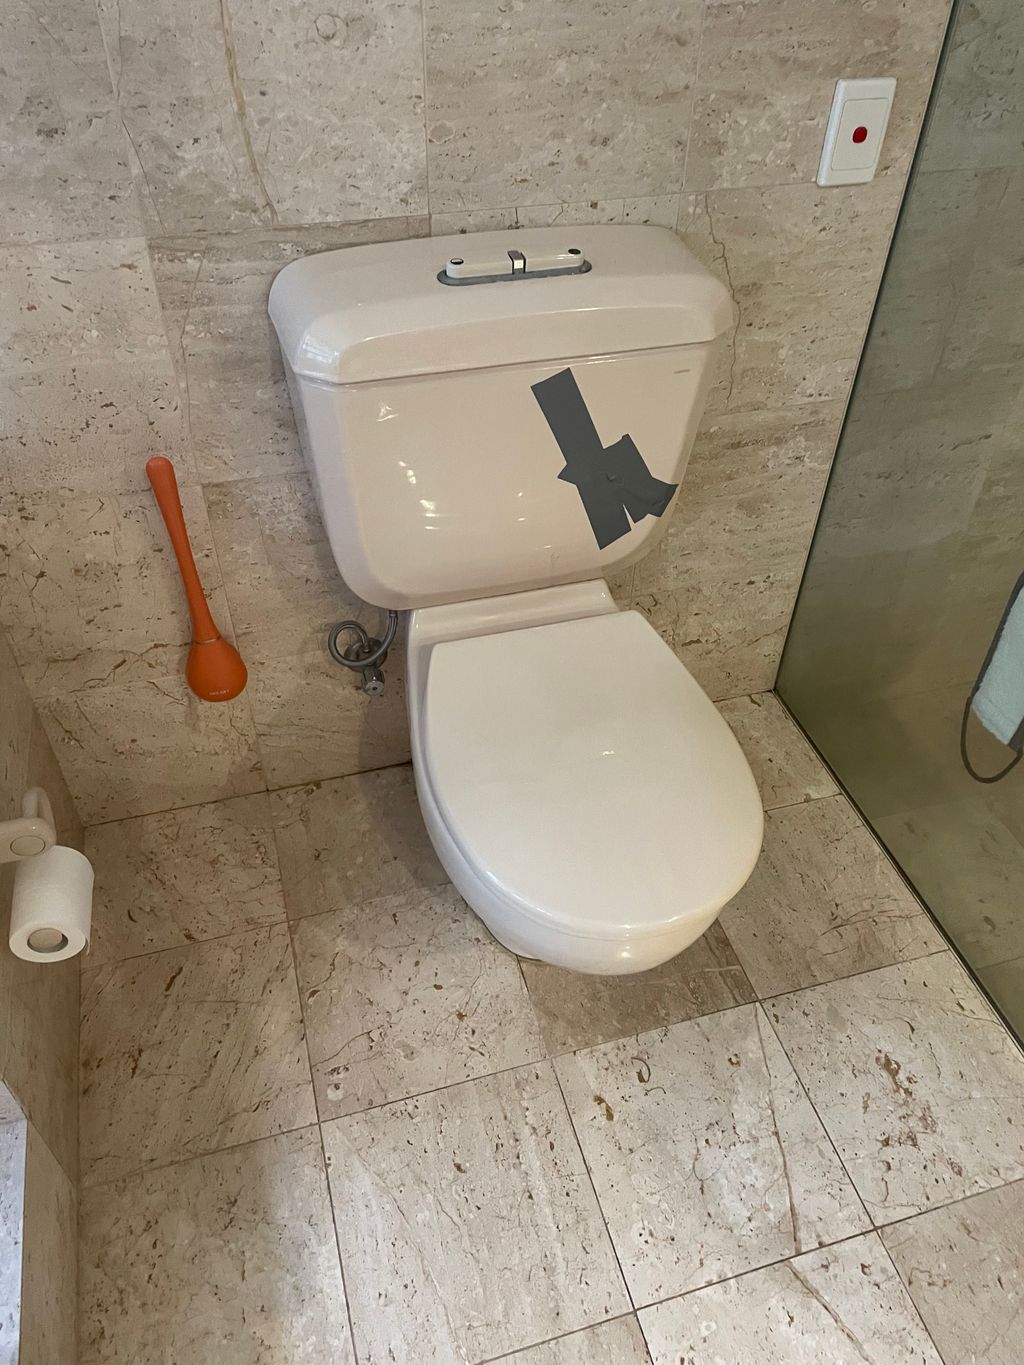
Before fixing your toilet, you need to determine where the leak is coming from and whether you simply have a running cistern or a leaking toilet proper – a good rule of thumb is that if there’s water on the floor, you have a leaking or blocked toilet, if there is just water running into the bowl, you have a leaking cistern. To test if water is leaking into the toilet pan, flush the toilet and leave it for 10 minutes. Go back to the toilet and place a sheet of toilet paper at the back of the bowl and observe if water is running onto the toilet paper.
Bear in mind that in Queensland, there are strict regulations on the type of plumbing work that you can perform yourself.
Causes of a leaking cistern
Most causes of a leaking cistern can be performed by yourself and don’t need the assistance of a professional plumber unless you run into problems.
The inlet/fill valve
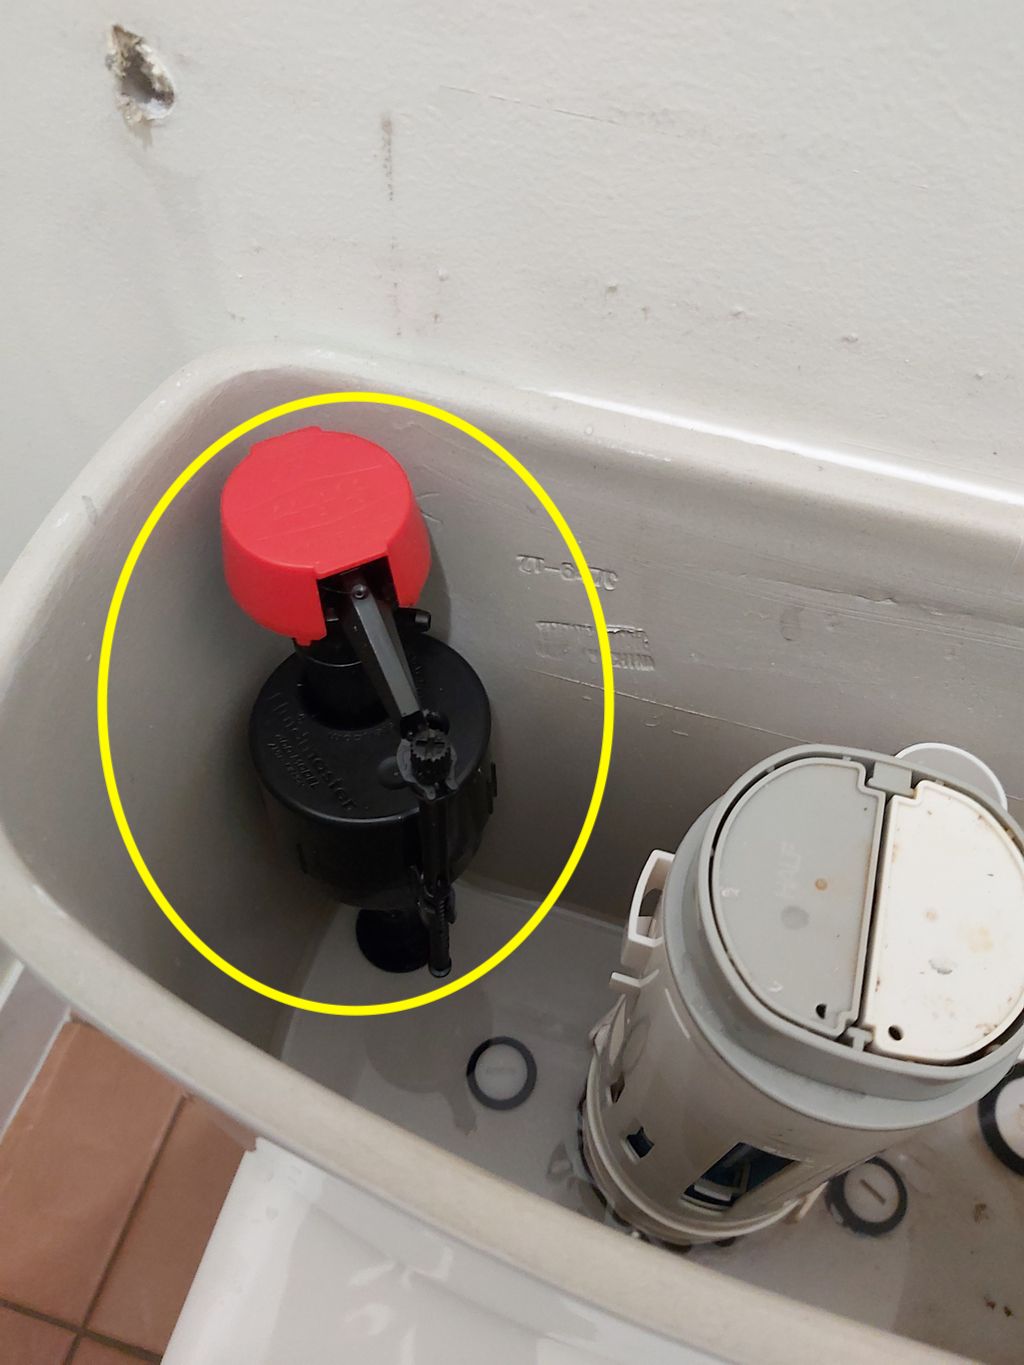
An inlet valve, also known as a fill valve, is a device located in the toilet cistern that controls the amount of water that enters from your supply line. It regulates the water level in the cistern, and when working properly, should stop the water flow once it reaches a certain level. A faulty inlet/fill valve will result in water dripping onto the floor beneath where the inlet valve connects to the cistern. It can also cause a hissing sound or water to spurt out the top of the cistern.
How to replace an inlet/fill valve in a toilet:
- Turn off the water supply
- Drain the cistern by flushing the toilet
- Detach the toilet inlet valve
- Put the new toilet inlet valve in its place, ensuring all the washers are in place
- Tighten the fill nut (often located under the cistern)
- Attach it to the water supply line and tighten, then turn the water back on
The outlet/flush valve
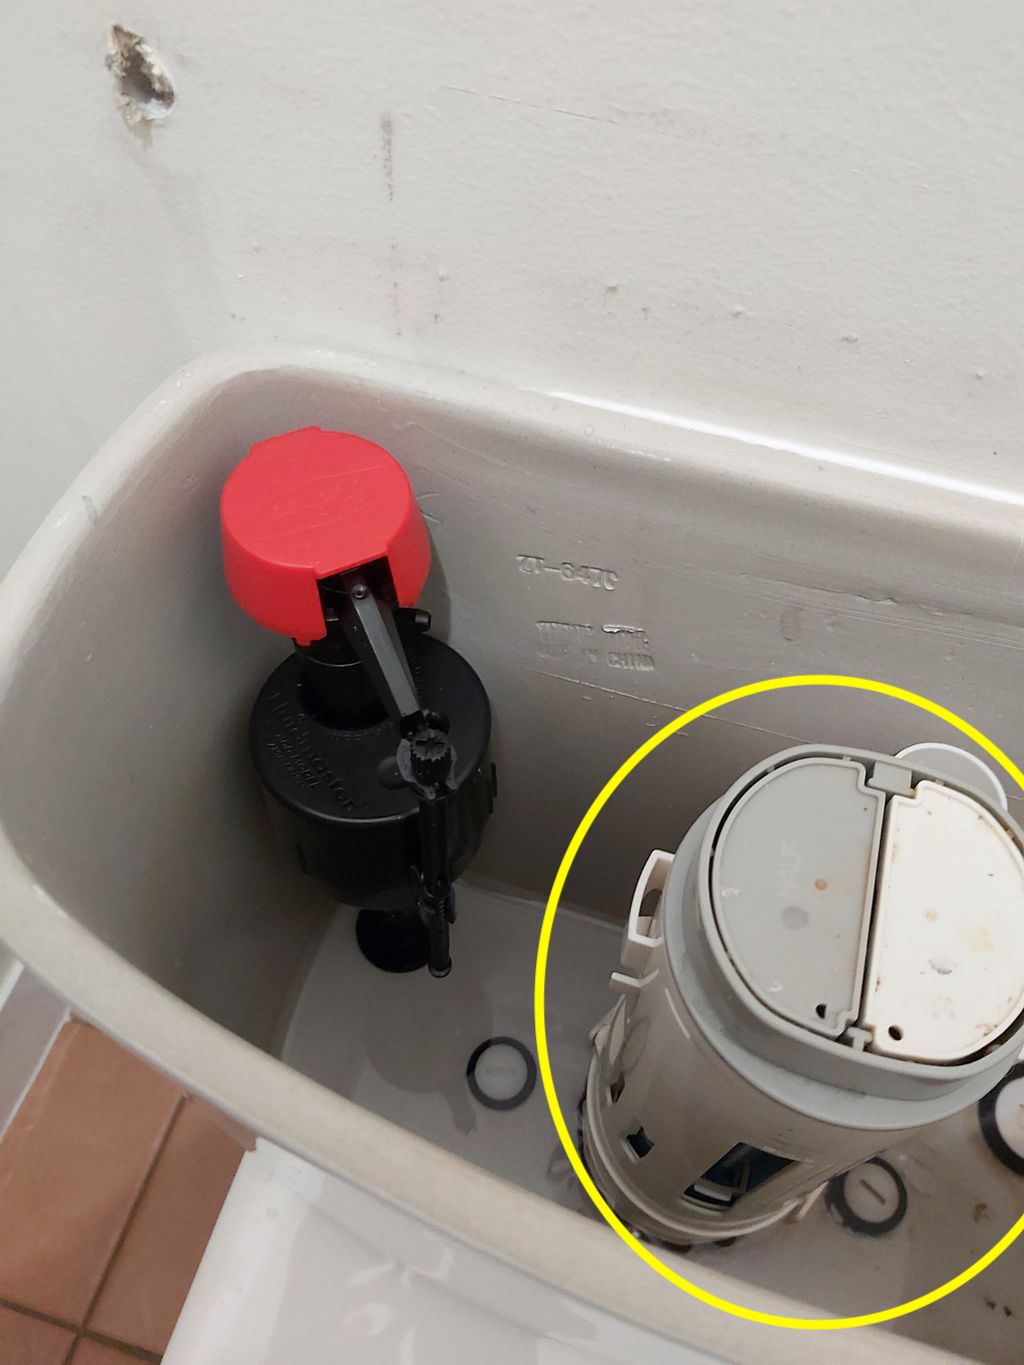
A flush valve is a component of a toilet’s flush mechanism that controls the release of water from the cistern into the bowl when the toilet is flushed. Both the valve and washer can cause leaks.
How to replace a flush valve:
- Turn off the water supply.
- Flush the toilet to empty the cistern.
- Remove the cistern lid.
- Unscrew the back nut and flush pipe nut and remove the outlet valve. You may need to remove the whole cistern to access this valve.
- Inspect the valve and replace the valve and seating washer.
- Make sure the new washer is flat against the valve.
- Install the new flush valve, nuts and cistern lid.
- Turn the water back on and check for leaks.
It is recommended to consult with a plumber if unsure.
Causes of a leaking toilet
Replacing a leaking toilet can be performed by yourself and doesn’t legally require the assistance of a licensed plumber, although the aid of a licensed plumber will reduce the chances of any issues arising further down the track. If you choose to relocate your toilet while replacing it then this falls under ‘notifiable work’ and you will require a Form 4 and a licensed plumber to perform the work.
Cracked bowl or cistern
If there is water leaking onto the ground itself, then you need to check the bowl and cistern for cracks. Cracks can appear during manufacturing or simply over time with wear and tear. Next, you must determine whether the crack is above or below the water line. If it’s above the water line then it’s probably not the problem. If it is below the water line you will need to fix it. Generally waterproof epoxy is the easiest fix. It’s worth noting that if you have a large crack in your toilet bowl you should always replace the toilet as these can be dangerous. A crack can develop into a break and sharp porcelain can slice through skin leading to severe injuries.
How to fix a crack in your toilet
- Turn off the shutoff valve below the cistern. Then, flush the toilet to drain the water from the cistern and bowl, removing any leftover water.
- Next, prepare the crack by cleaning and sanding the area in question. This will help ensure the waterproof epoxy adheres correctly.
- Apply the epoxy (after following manufacturer guidelines in preparation). Allow it to set, again to the manufacturer’s specifications.
- Turn the shutoff valve back on and test the toilet to see if it is still leaking. If it is, repeat, if not well done – you’ve fixed your toilet!
If you repeat this process a couple of times and it still doesn’t work, you will need to replace your toilet. You can do this yourself if you’re handy but contact a professional plumber like DCM Plumbing if you need help with this!
Poor installation
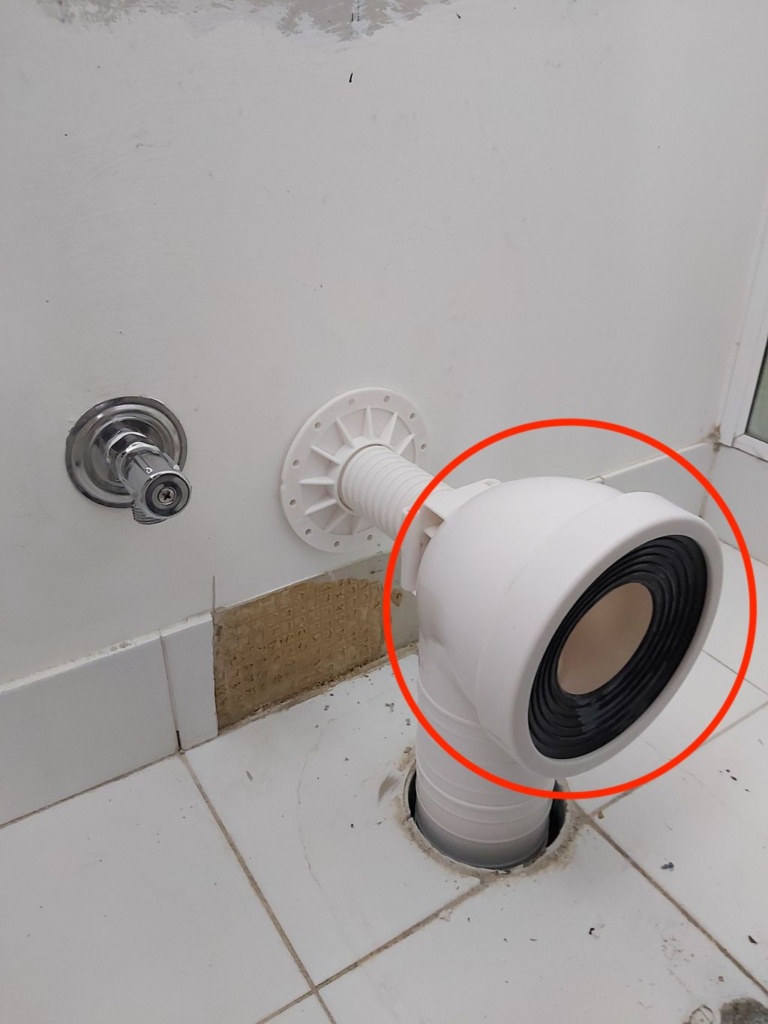
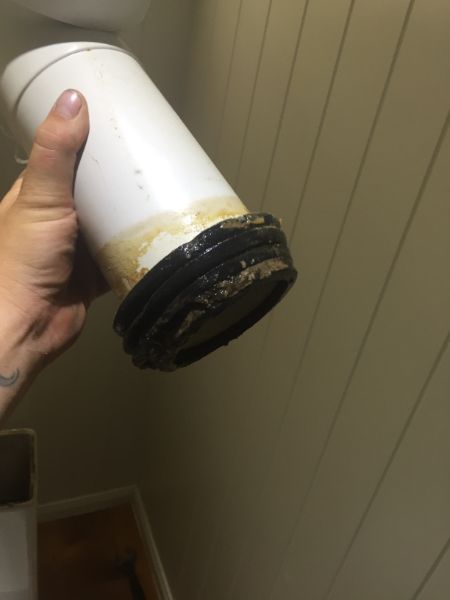
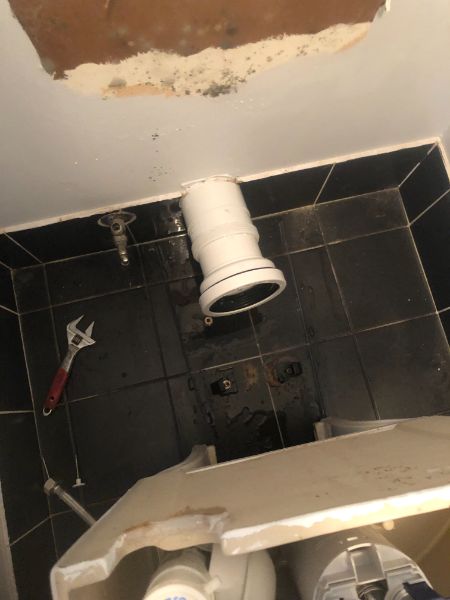
A poorly installed toilet can leak in several ways. One common way is If the leak is caused by a problem with the seal between the toilet and the sewer pipe. To check the seal, visually inspect the pan collar rubber for deterioration or damage as you may need to replace this rubber seal. This can be a more difficult and messy repair that will require the toilet to removed and the pan collar replaced. This needs to be performed by a professional.
Another way a toilet can leak is if the water supply line is not properly connected to the toilet fill valve, causing water to leak out of the valve and onto the floor.
If the water supply line is leaking, you will need to tighten the connection or replace the line and the stop cock/shut-off valve.
It’s important to note that if you’re not familiar with plumbing, it’s best to call a plumber to fix the issue, as improper installation can cause more damage and can be dangerous, and if you’re on the Gold Coast, DCM Plumbing are the plumbers you need for the job.
Blocked or clogged toilet
A blocked or clogged toilet can cause a leak as when the toilet drain pipe is clogged, the built-up pressure can cause the water to seep out of the base of the toilet or through the seals around the rear pipework.
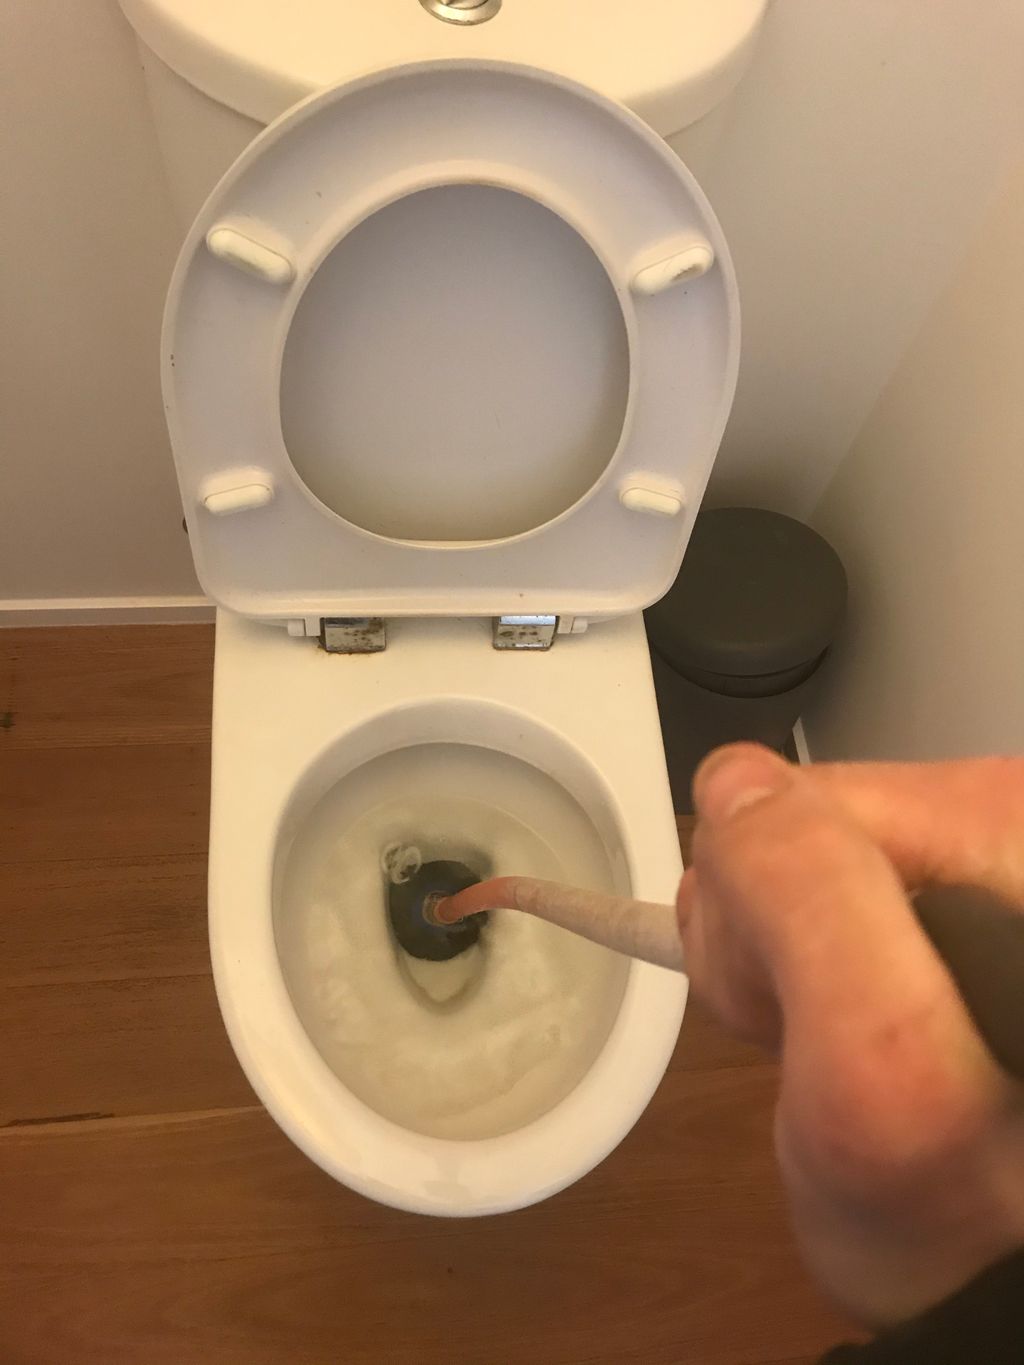
To fix a blocked toilet, you can try using a plunger to forcefully remove the blockage. Make sure to cover the overflow pipe if there is one with a rag to create a better seal while plunging. If this doesn’t work, you may need to use a toilet auger, which is a long, flexible rod with a curled end that can reach and remove blockages. If other fixtures are affected, you may need the help of a professional plumber to clear the blockage as the sewer line is likely to be blocked.
Contact DCM Plumbing for your leaky toilet needs
DCM Plumbing is an excellent choice for fixing your leaking toilet. We are your local Gold Coast plumber with a highly skilled and experienced team who are equipped to handle any plumbing issue, big or small. We use the latest tools and technology to diagnose and fix problems quickly and efficiently, ensuring minimal disruption to your daily routine.
Additionally, we offer competitive pricing and a satisfaction guarantee, so you can have peace of mind knowing that you are getting the best value for your money. Don’t just take our word for it – we have over 900 5* Google reviews from happy customers. Trustworthy and reliable, DCM Plumbing is the perfect choice for all of your plumbing needs, so contact us today.
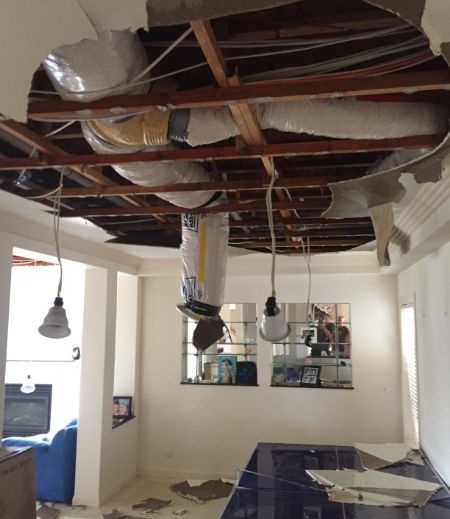
Burst flexi hoses are a common problem in Australian homes, yet most people don’t know or simply overlook the damage a burst flexi hose can cause.
In fact, it is estimated that 22% of all water damage in Australian homes is caused by a burst flexible hose, according to data provided by IAG, one of Australia’s leading insurance agencies.
So, what is a flexi hose? Where are they typically found in the home? Why do people use them? What can you do to prevent them from bursting? How can you tell if a flexi hose is compromised and may burst? We will answer all of these questions and more.
DCM Plumbing is the best plumber on the Gold Coast. We are available 24/7 for all your plumbing needs. With over 900 5* Google reviews and 35 years of experience, we are known as the best for a reason. Got a blocked drain? Need help with leak detection? Want to learn how to clear a blocked drain? We can help.
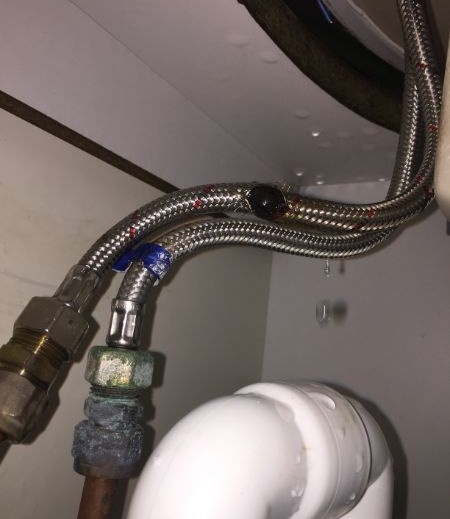
What is a flexi hose?
A flexi hose, also known as a flexible hose or flexible connector, is a type of hose typically used in homes and buildings to connect appliances that use water. These hoses are typically made of a rubber pipe enmeshed in braided lengths of stainless steel. They come in a range of lengths and sizes depending on the appliance they will connect to.
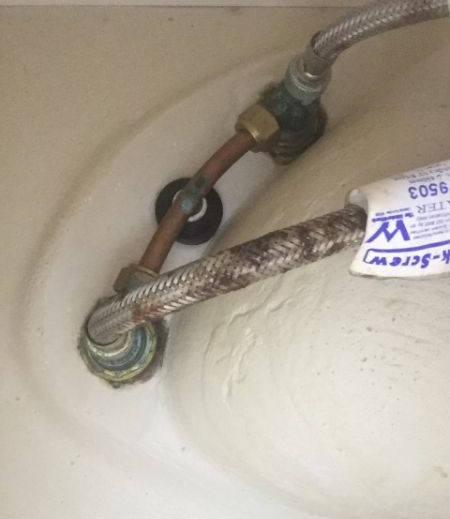
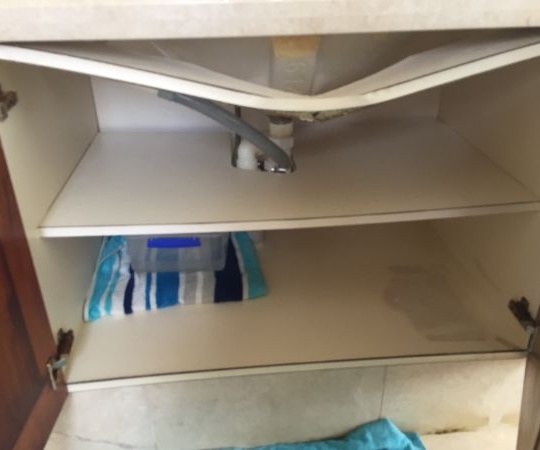
Where do you usually find flexi hoses in the home?
Flexi hoses are found under sinks, in the bathroom, kitchen, or laundry.
While flexi hoses can be more than a nuisance when they burst, they are an essential part of any home’s plumbing system and deserve the attention and maintenance necessary to prevent costly damage and repairs. If you need help replacing or repairing flexi hoses in your home, contact us today. We are available 24/7 to respond to all of your plumbing needs, no matter how big or small!
Why do people use flexible hoses?
For the most part, people use flexible hoses as they are cheap and easy to find. On top of this, they are extremely flexible and can be moulded and shaped in order to fit under sinks that may otherwise be difficult to plumb with a rigid copper pipe. These benefits are generally deemed to outweigh the risks, especially when well maintained.
How often should I replace my flexi hose?
Each brand and type of flexi hose will have different longevity. The flexi hoses we choose to work with at DCM have a ten-year warranty, but if you’re unsure of the quality of your flexi hoses or when they were put in, replacing them every five years is a safe bet.
Remember, the price for neglecting a hose is far greater than that of replacement! We’d recommended performing a check on the flexi hoses in your home once every six months to be sure that they haven’t been damaged.
Signs that your flexi hose might burst
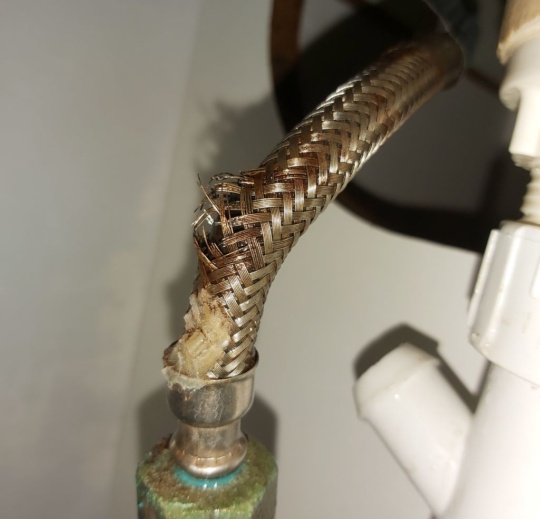
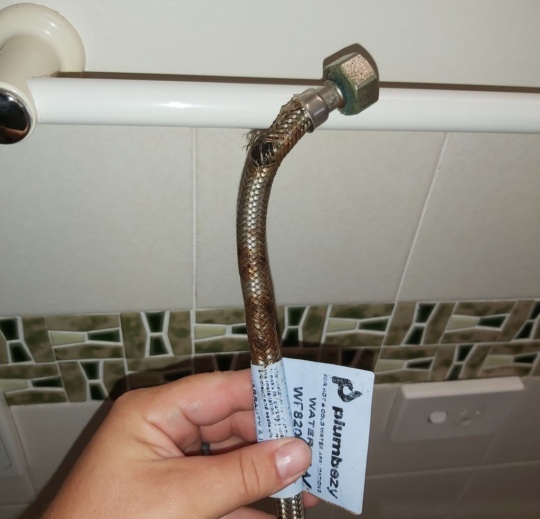
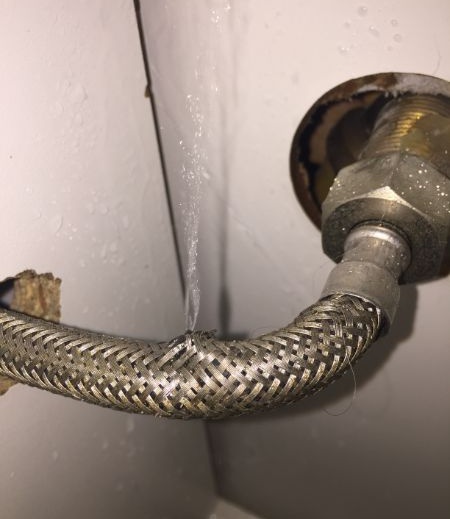
If you notice any signs of wear or damage, such as:
- Bulging
- Cracks
- Fraying
- Leaks
- Corrosion
It is best to replace your flexi hose right away.
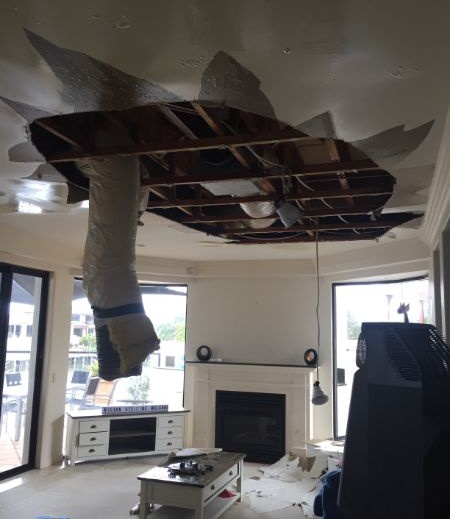
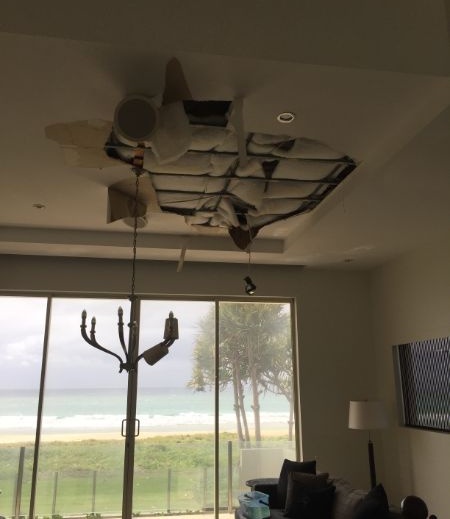
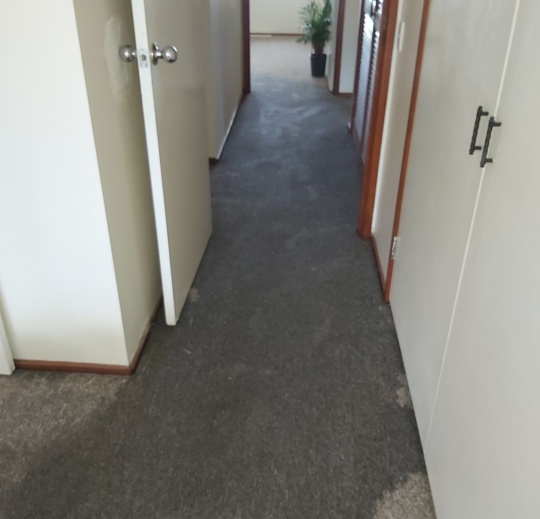
The damage a burst flexi pipe can cause

How to prevent a flexible hose from bursting
The best way to prevent a flexible hose from bursting is to perform a check every six months and replace them if they seem damaged, or once every five years if they seem undamaged but you’re unsure of the quality, or at the end of the 10-year warranty period if you choose to work with DCM Plumbing. There are a variety of other measures that you can take in order to prevent a flexi hose from bursting or at least mitigate the damage caused by a burst flexi pipe, such as:
Installing a pressure-limiting valve
Installing a pressure limiting valve means that the pressure entering your flexi hose doesn’t get past a certain threshold, therefore your flexi hose won’t be subject to overly high pressures, which will reduce wear and tear and also reduce any damage if the hose were to burst, as less water would be flowing through the pipe.
Installing an isolation tap to the flexi hose connections in your home
Isolation taps are a great way to mitigate damage from a burst flexi hose, as they allow you to control the flow of water to each one. This means that if a flexi hose were to burst, you’d be able to quickly turn off the water supply to the hose and prevent further damage.
Making sure to buy good-quality flexi hoses
A simple yet effective fix. Don’t cheap out on your flexi hoses, as they are a crucial part of your home’s plumbing system. Investing in good quality flexi hoses will ensure that they last longer and are less likely to burst, saving you time, effort, and money in the long run.
Turning off the main water supply if you’re going away for an extended period of time
If you’re going away for any extended period of time, be sure to turn off the main water supply. This will nullify the likelihood of water damage while you’re away, so you can rest easy knowing that your pipes and flexi hoses won’t cause issues when you’re not home. A burst flexi hose when you’re away on holiday means you could have thousands of litres of water flooding your home, leading to thousands of dollars in damages. Don’t take the risk! Take our word for it when we say we’ve seen the damage a flexi hose can do…
DCM Plumbing can help install, maintain, and repair any flexi hoses in your home
When it comes to flexi hoses, there’s no point in risking it; it’s always best left to the experts. At DCM Plumbing, we have years of experience working with flexi hoses and know how to keep them in tip-top condition, and when to replace them. Whether you’re looking for installation, repair, or are interested in any of the preventative measures we mentioned, get in touch with us today and we’ll be happy to help! With expertise in all areas of plumbing and competitive prices, DCM Plumbing is the best choice for any flexi-hose needs in your Gold Coast home. Contact us today.
DCM Plumbing are family run team of professional plumbers. Our team is dedicated to supplying a professional plumbing and drainage service throughout the Gold Coast. We have been servicing residential and commercial properties since 2002 within Burleigh Heads and throughout the Gold Coast region.
- About Us
- Why Choose Us
- Meet Our Team
- Locations
- FAQ’s
- Who We Work With
- Residential
- Commercial
- Real Estates / Body Corporates / Strata Managers
- Builders

Google Rating
5.0
Based on 1175 reviews
DCM Plumbing & Drainage Pty Ltd
5.0


Louise Moran
1713328262
Prompt and reliable service. The plumber explained everything well and had a lovely manner. Will definitely use them again.

Richelle Williams
1713262695
Great service and communication. Turned up on time, even took their shoes off at the door! Thank you


Jordana Downes
1713241011
Friendly and quick service. Christian explained everything thoroughly. Highly recommend there services. Mark


Gail Casey
1712814258
Thank you to DCM plumbing and big thank you to Angus. He was such a pleasure to deal with and explained all the things we wanted to know and what he recommended we are very happy with. He worked tirelessly until the work was completed. We highly recommend his high standard of work.


Chloe noll
1712710502
Highly recommend DCM Plumbing & Drainage.Prompt service and great communication. Efficient diagnostics! Ask for Christian.

Jacqueline Taylor
1712708309
Huge thanks to Jackson for his hard work and great service installing a new hot water system, fixing taps and drains at my house yesterday. He was polite, efficient and knowledgable. Highly recommend this company and will request Jackson for future jobs if needed.

Thomas Chorles
1712532796
Jackson arrived promptly and was very polite . He quoted for each job before approaching. He worked efficiently and I was very happy with his work . A good experience overall .


Brittany Keenan
1711769985
The whole DCM team provided expert and professional service, while being incredibly friendly and flexible, particularly Jackson. We were so happy with their services and will definitely use DCM again when needed!

david lawley
1711487532
Pete the plumbing tradesman was outstanding, very helpful and professional, knew exactly what to do. Checked everything in the house and rectified the leak in the bathroom vanity.A1 service. Great person.

trevor cooke
1711437355
Great service, especially working and completing the job in the rain. Very happy with the service provided by Jackson and Meredith (in the office).


Gwenda O'Grady
1710911067
Hi it's Gwenda. Was very happy with the Young man who did a great job. Have already forgotten.With my age. 81. His name. My memory is getting worse. Was it Jackson. ?1 will read your note againAnd will write what you saidAnd then get in touch..with Gold Coast Council. Re the water .Am a worried re the expense.My son is going away for a month soon.Will have to get in touch with himFor his help.Was very happy l got your business. Thank you.

Samuel Barker
1710895578
Excellent service. We had what appeared to be a blocked sink drain but turned out to be a bigger problem, the team were very professional in diagnosing the problem. Excellent communication at every stage of the process, beginning with the office organising the appointment, through to the crew advising us they were running a bit late. Good transparent explanation of pricing, and the team went out of their way to give different pricing options and find cheaper ways of doing the job. Absolutely recommend DCM plumbing and drainage.


Gail
1710240776
Very happy with every aspect of DCM Plumbing. Communication, service and all staff contact was an absolute joy. I have worked in Building Industry on Gold Coast for 23 plus years and have seen a lot in my time. I cannot fault DCM Plumbing in anyway. Thank you Jackson for all you did for me today.

Lizzie Marsh
1710222468
Awesome service for a tricky job. Well done guys! Prompt, excellent communication.

Di Dawbin
1710124637
Excellent service. We were advised by email and txt message of whom would be attending with a picture of representative for id. He then advised of an earlier than scheduled arrival time andwas very professional. Would recommend firm to those in need of copper water pipe leakage fixes. Will definitely reuse in future if required.

Jack O'Rourke
1709864756
Great guys, knowledgeable and experienced, prompt efficient reliable.Cleaned up and kept us in the loop during the work. Will no doubt call you again next time! Thanks so much, great family business you can trust not to rip you off! :)

Rachel Hill
1709796361
Great prompt same day service, Pete provided friendly efficient service and found our issue and fixed quickly. Highly recommend. Thanks

Campbell.
1709598663
A big thank you to the two young gentlemen that came over today. Excellent service & workmanship Prices are a tad higher than expected!


Underpicker
1709186430
Very Happy with Sam and his Team for the Plumbing & Drainage work they did recently at our residenceThey carried out the work in an extremely efficient & professional manner, communicating with us throughout the whole process.(Their price for our job was very competitive as well)Would highly recommend DCM Plumbing to anybody wanting expert trades people who will do the job properly and are a pleasure to deal with

Coralie Blake
1709085063
Great service by Jackson and Laura, cleaned a blockage.Very respectful and pleasant guys.Thank you

Ben Morris
1709075240
Jackson and Lauren were open and transparent about cost and scope of works completed at my house, They got the job completed with ease. I would truly recommend them for future works.


Michelle Zhang
1708649237
Very professional company. Quick quote, very friendly office person, sent reminder message before the appointment day with plumber's name, photo, date etc. The plumber Peter is a very friendly and good guy, checked all taps inside my room without extra charge and fixed my shower head perfectly. Price is reasonable and changed two nice taps and didn't make any messy on the floor. I have recommended my neighbour to use their plumbing service.


Ann Archer
1707275027
Plumber was punctual, skilled and knowledgeable. I was very happy with the service.

Jaggs Journeys
1706853332
I was very impressed with their level of service. Their communication was also excellent and Pete was very professional and friendly and had the issues all sorted and fixed in a very short amount of time! I would definitely use DCM again and would also recommend them 👌Regards,....Shane

Harnoor Kaur
1706843443
DCM Plumbing & Drainage provided exceptional service. The communication throught the process was impressive. The team's expertise was evident in the quality of work. They addressed the plumbing issue efficiently, leaving me satisfied with the result. I highly recommend them 👍👍

Graham Leo
1706160394
I phoned for an emergency plumber at 10.30pm. Meredith answered and was brilliant in organising service. Jackson and Keane came next day to repair a leak in the ceiling space. Did a great job. Efficient, good-humoured, and polite. They cleaned up behind themselves and were really professional. Meredith rang us to say they’d be running a bit late and kept us well informed. We couldn’t be happier with the service. Thanks everyone.

Kris Mant
1705564464
I would highly recommend DCM plumbing they are the most reliable and trustworthy company and I wouldn’t use anyone else, I had a water leak and they worked hard in the rain and got it fixed with no problem at all they go over and above to get the job done.

Carmel Sporne
1705549525
Christian did an excellent job in unblocking our drain. He was on time, professional, very friendly and has great customer skills. I would be happy to use DCM Plumbing and Drainage again and will be recommending them to family and friends.


Kane Tierney
1705281150
Great service from start to finish. Christian did a great job installing our new basin and Karlien was very quick to organise the quote and repair time. Thanks again!
©DCM Plumbing & Drainage 2024 All Rights Reserved
Terms and PrivacyGold Coast SEO & Design by Five by Five


![[1]](https://commons.wikimedia.org/wiki/File:Alexander_Cumming_Clockmaker.jpg)