Want to make an appointment with one of our expert plumbers? Get in touch!
Need to learn how to turn off the water to your house? Here are 4 easy steps to help you do it quickly and safely.
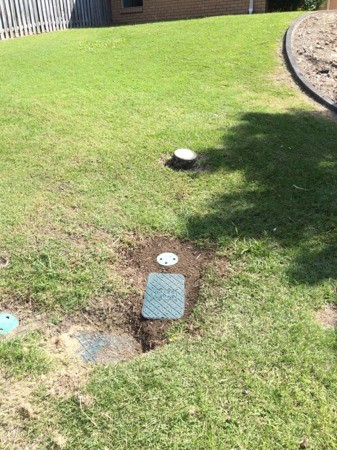
Step 1: Locate Your Water Meter
Your water meter is typically found in a black or green box in the nature strip outside your property. In some cases, it might be near the outer boundary of your property. If you live in a unit, apartment, or townhouse, you may not have an individual water meter outside, but there is most likely one inside.
Indoor Apartment Isolation Valves
If the isolation valve is inside, it is usually next to a toilet, under a laundry tub, or under the kitchen sink. This is a good thing to identify before an accident happens! In rare circumstances, there might not be a way to shut off the water to your individual unit and you might need to turn off the water for the whole building, or sometimes you might need assistance from body corporate or a professional plumber to turn off the water.
If it’s an emergency such as a burst flexi pipe, just turn off the water and ask for forgiveness later – people will understand (hopefully)!
Tip: Any time you move into a new property it’s a good idea to familiarise yourself with the location of your water meter, so you are prepared in case of emergency.
Step 2: Open the Meter and Locate the Stop Valve
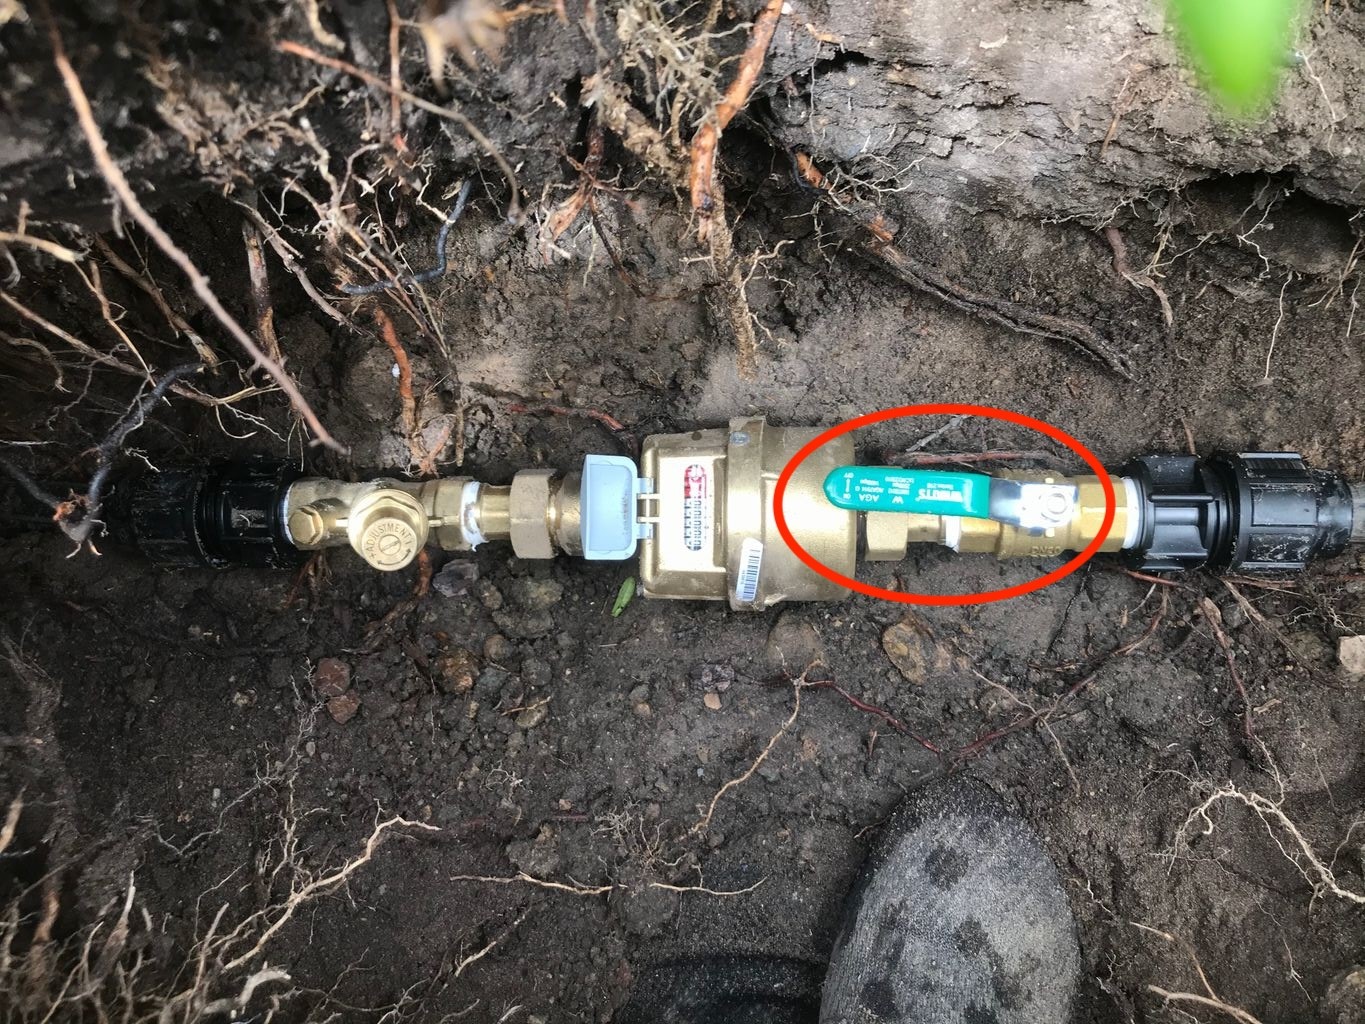
Next you need to open the meter. You may need a flathead screwdriver to open the box (although often we find that the cover is not screwed on but just sitting loosely over the hole).
The stop valve, also known as the main shut-off valve, is usually located next to your water meter. It controls the flow of water from the mains into your home. The valve typically has a handle or lever that you can turn to stop the water supply.
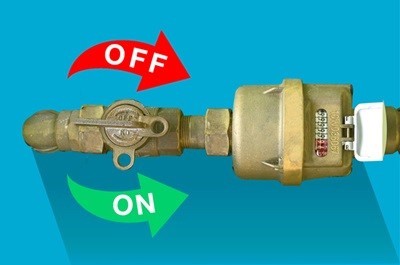
Step 3: Turn Off the Stop Valve
Once you’ve located the stop valve, turn it clockwise (to the right) until it’s fully closed. If you’re not sure of which way, don’t worry, you’ll only be able to turn it one way as it is either on or off.
This action will shut off the water supply to your home or building. Be cautious not to over-tighten, as this could damage the valve.
Step 4: Check That There is No Water Coming From Your Taps
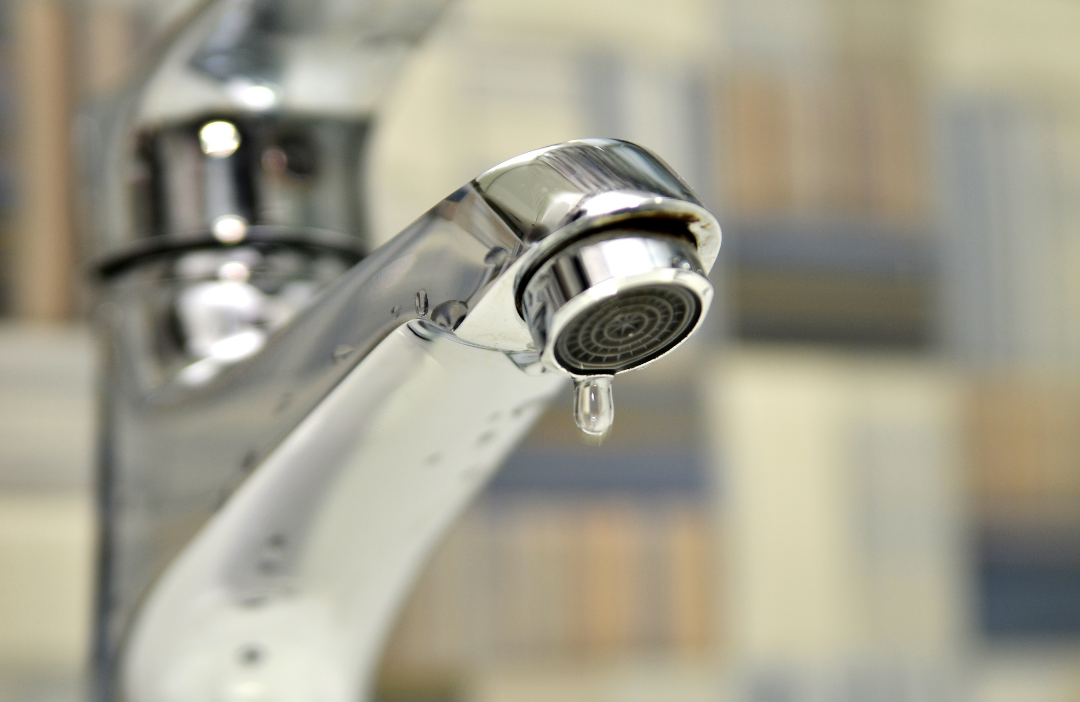
After turning off the stop valve, go inside and turn on a tap to ensure the water has stopped flowing (if it’s an emergency, you’ll probably know, as the flooding should have stopped!) If water is still running, double-check that the valve is fully closed.
This simple four-step process helps you safely turn off the mains water supply, preventing potential damage from water leaks or burst pipes.
Still Can't Turn The Water Off?
If you encounter any issues, or if the water doesn’t stop, you should contact a professional plumber for assistance. Once your issue has been rectified, be sure to switch your water supply back on.
Keep our contact details handy so you’re ready if a water emergency strikes again.
Do you have some small fuzzy bugs buzzing around your kitchen sink or bathroom? Well, they could be drain flies. Drain flies, also known as sewer or sink flies, are small moth-like flies that love damp environments – particularly the drains in your kitchen or bathroom.
Once you notice one in your house, it’s usually only a matter of time until you notice more (lots more), and so getting rid of drain flies quickly is essential.
To help you in your battles against these winged nuisances, we’ve put together 6 tried and true methods to get rid of drain flies once and for all, as well as several prevention methods and a bit of information to help you understand your not-so-welcome new housemates.
6 Ways to Get Rid of Drain Flies for Good
Here are our 6 plumber-recommended ways to get rid of drain flies, for good.
1. Clean Drains
The first step to getting rid of drain flies is by making sure your drains are clean. A clean drain kills the breeding ground for these flies, which means you can control their proliferation. Use your usual cleaning agents along with a pipe brush to scrub and clean around and inside the drain that you think they are coming from. Do this routinely around once a week to prevent the build-up of organic material where drain flies breed.
2. Boiling Water
A straightforward yet effective method is to pour boiling water down the drain. This simple step can help kill drain flies and their larvae. Repeat this process once or twice a week, ensuring you pour the boiling water both down and around the drain to target all potential hiding spots. Easy and effective!
3. DIY Drain Cleaner
A homemade drain cleaner solution can also do wonders. Mix equal parts of salt and baking soda (half a cup each), and slowly pour the dry mixture down the drain, then follow with a cup of vinegar. Let it sit overnight and then rinse with boiling water the next morning. The chemical reaction will not only kill drain flies but also remove any grime or grease that might be acting as a breeding ground.
4. Commercial Drain Cleaners
If your drain fly issue persists, consider using commercial drain cleaners such as Drano. These solutions are formulated to clear out the drains and pipes effectively, removing any debris that might serve as a breeding spot for drain flies. Using these products can aid in preventing new eggs from hatching. Try not to use them too often though as overuse
5. Apple Cider Vinegar Trap
To deal with adult drain flies that are already in your home, you can create a simple trap using apple cider vinegar. Place a small dish filled with apple cider vinegar covered in plastic wrap near the infested drain. Punch small holes in the plastic wrap with a fork or skewer or the like to allow the flies to enter but not escape. The flies will be attracted to the vinegar and will get trapped, eliminating them over time.
6. Professional Plumbing Services
Finally, if all else fails, it’s time to call in the professionals. Regular drain cleaning services provided by professional plumbers can effectively prevent drain fly infestations. Plumbers (like us) can use tools like water jetters to clear blocked drains and thoroughly clean your pipes. At DCM Plumbing, we offer expert drain cleaning and drain fly removal services on the Gold Coast to help you get rid of drain flies and prevent future infestations.
Remember, if your efforts to eradicate drain flies last longer than 20 days with no success, it’s time to contact professional exterminators or plumbers. As the best Gold Coast plumbers, DCM Plumbing is always ready to help you with your drain fly issues. Call us today.
What Actually Are Drain Flies?
Drain flies, also known as sink flies, sewer flies, or moth flies, are small, moth-like insects that breed and feed in areas with standing water. They are in the family Psychodidae. As their name suggests, they are commonly found in drains, where a build-up of organic matter provides food and an ideal environment for laying their eggs. They are typically 1.5 to 6 mm long depending on the species, with a fuzzy, moth-like appearance, thanks to a covering of tiny hairs on their wings and bodies (although they are not actually moths).
These insects are known for their ability to reproduce rapidly, with eggs hatching within 48 hours and larvae reaching adulthood in just over a week. Drain flies are capable of laying 30 to 100 eggs at once, which means their populations can grow exponentially in a short time.
While their preferred habitat is within the organic build-up in drains, drain flies can also be found in other moist, decaying environments such as compost piles, garbage bins, or even damp mops and rags.
It’s important to note that drain flies themselves aren’t necessarily a health hazard, but their presence can indicate other issues occurring in your pipes.
What Causes Drain Flies?
A drain fly infestation is typically caused by a build-up of organic matter in moist, damp places. They are particularly attracted to stagnant water and the biofilm (or grime) that forms in uncleaned or slow-draining pipes. This includes kitchen and bathroom drains, sewage systems, and even gutters and drainpipes.
Drain flies lay their eggs in this decomposing organic material, providing a food source for the larvae once they hatch. If these conditions persist and are not addressed, a small problem can quickly turn into a full-fledged infestation. Yuck!
Regular cleaning and maintenance of drains are vital to prevent these conditions that attract drain flies.
How to Identify Drain Fly Larvae
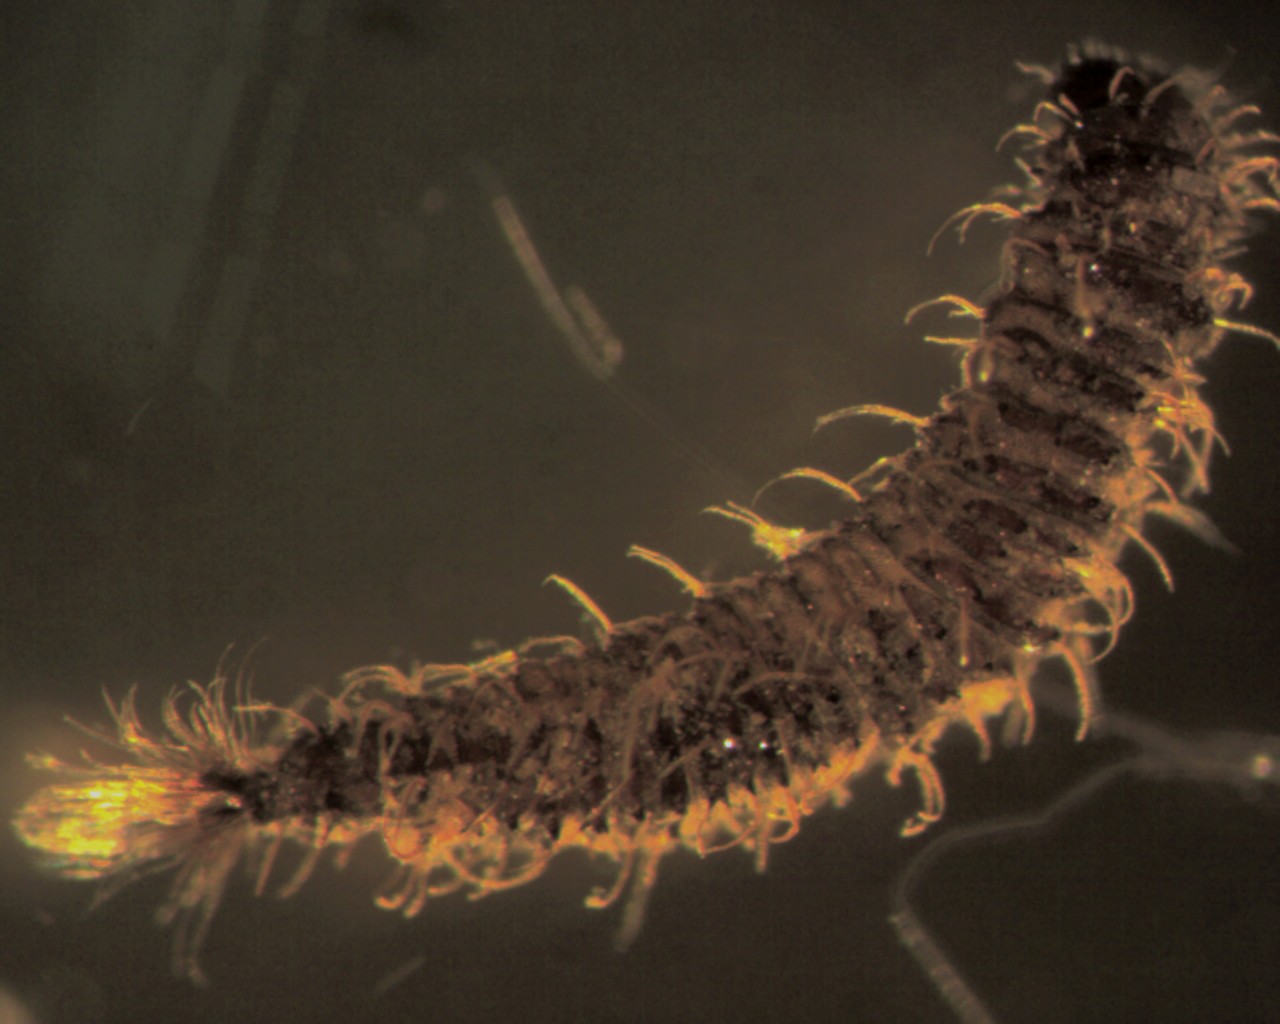
Erin Hayes-Pontius, CC BY-SA 3.0, via Wikimedia Commons
Identifying drain fly larvae can be a challenging task due to their small size and the fact that they inhabit hard-to-see places. Drain fly larvae are typically between 4 and 5 mm long, with a characteristic worm-like appearance. They are usually greyish or translucent in colour, which can make them difficult to spot against similar backgrounds.
You’ll most commonly find them in areas where water accumulates for a week or more. This includes seldom-used toilets and sink or floor drains, especially in basements or garages, or in drain pans beneath refrigerators. You might even spot the grey, wriggling larvae swimming in the water.
Drain flies can also breed outdoors during the summer, entering homes through open doors or windows. They thrive in low, wet areas such as those where air conditioning units drain or in clogged guttering. Address these potential breeding sites if the drain flies do not appear to be emerging from inside your home.
Are Drain Flies Harmful?
No, drain flies are not harmful. They do not bite or transmit diseases to humans. However, they can be a nuisance due to their persistent presence once they infest a home. Additionally, a large infestation of drain flies may indicate a problem with drain function or cleanliness.
Are Drain Flies and Fruit Flies the Same?
No, drain flies and fruit flies are not the same. Fruit flies are typically smaller than drain flies and are often seen buzzing around overripe or rotting fruit, fermented goods like beer and wine, and trash cans. They are generally a light yellow to brown colour and have red eyes. Drain flies, on the other hand, prefer damp and wet areas like drains and sewers where they feed and breed on decaying organic material. The two flies have different appearances, preferred habitats, and life cycles.
Keep Your Pipes Drain-Fly-Free with DCM Plumbing
Navigating a drain fly infestation might feel daunting, but armed with the correct knowledge and methods, they can be eradicated effectively. From regular cleaning and homemade remedies to professional plumbing services, the battle against these persistent pests is winnable.
If the issue extends beyond your control, don’t hesitate to reach out to DCM Plumbing. Our experienced team is always available to offer help, providing reliable, efficient services to ensure your home remains drain-fly-free. By staying proactive and addressing the problem at its roots, we can prevent future infestations, keeping your home safe and sanitary. Remember, prevention is always better than a cure!
Toilet bowl stains are an unfortunate but extremely common household issue. Despite regular cleaning, do you find your stubborn marks won’t budge? Then it might be time to level up your approach and test out these expert methods for toilet bowl stains.
This guide offers practical solutions for tackling stubborn toilet bowl stains, whether you’re dealing with hard water residue or mysterious marks, follow these tips for a sparkling clean toilet.
What Causes Toilet Bowl Stains?
Unsightly toilet bowl stains are more than just an eyesore; they can offer insights into the water quality and hygiene practices in your home.
Hard Water Deposits
Areas with hard water suffer from a high concentration of calcium and magnesium. These minerals form chalky deposits that not only discolour the toilet bowl but can also affect its flushing efficiency over time. The white or grey buildup is not just a cleaning challenge but a sign that your water might be too mineral-rich.
Mineral Deposits
Iron and manganese are minerals that, while naturally occurring, can cause significant staining in your toilet bowl when present in your water supply. Iron deposits typically leave behind reddish or brown streaks that are notably tough to remove. Manganese, though less common, creates black or purple marks, giving the appearance of a toilet bowl in neglect.
Bacterial Blooms
One of the most common bacterias, Serratia marcescens, is notorious for its pink or red biofilm, often mistaken for a mineral stain. However, it’s actually a living organism, thriving on moist surfaces and feeding on fatty substances like soap residue. Other bacteria can produce stains ranging from orange to yellow, highlighting the need for regular cleaning and disinfection.
Rust
Old pipes or the internal mechanisms of the toilet tank can succumb to rust over time. This rust, when mixed with water, can seep into the toilet bowl during each flush, depositing reddish-brown stains. These stains can also indicate potential plumbing maintenance issues that might require attention beyond just cleaning.
How to Remove Stubborn Stains from Toilet Bowl
For those persistent stains that refuse to budge with regular cleaning, here are some at home remedies for tackling stubborn toilet stains:
Vinegar and Baking Soda
- Pour one cup of vinegar into the toilet bowl, making sure to coat the stained areas thoroughly.
- Allow it to sit for a minute, then add a cup of baking soda followed by another two cups of vinegar.
- Witness a fizzing reaction which helps loosen the stains.
- Leave the mixture to work its magic for about ten minutes.
- Scrub the bowl with a toilet brush, focusing on stained areas. The abrasive action of baking soda combined with vinegar’s cleaning properties will help lift stubborn marks.
- Flush the toilet to rinse away the residue.
Borax and Vinegar
For even tougher stains:
- Sprinkle a generous amount of borax over stains.
- Pour a cup of vinegar over the borax and let the mixture sit for 20 minutes. The longer duration allows the solution to penetrate and break down the stains.
- Scrub vigorously with a toilet brush, ensuring you cover all stained spots.
- Flush the toilet to wash away the cleaning mixture and dislodged stains.
For best results, repeat these steps if necessary, or consider leaving the mixture to sit overnight for deep-set stains.
Coke/Cola
As unsettling as it may be, surprisingly, coke can double as an effective cleaning agent for removing stubborn stains from your toilet bowl. The acidic nature aids in breaking down stains, especially those caused by hard water and mineral deposits.
- Empty a can or bottle of Coke into the bowl, aiming to cover the stained areas thoroughly.
- Allow the Coke to sit for at least an hour, but for tougher stains, leaving it overnight increases its effectiveness.
- After letting it sit, use a toilet brush to scrub the stains. The combination of Coke’s acid and the physical action of scrubbing should loosen and lift most stains.
- Finally, flush the toilet to rinse away the residue. If any stains remain, repeat the process or consider using a stronger cleaning agent for particularly stubborn areas.
Preventing Toilet Bowl Stains
Regular Cleaning: Incorporate toilet cleaning into your regular housekeeping routine. Using mild cleaners for weekly maintenance can prevent stain-causing minerals and bacteria from settling.
Water Softeners: For households with hard water, installing a water softener can significantly reduce mineral buildup in your plumbing and toilet, keeping those chalky deposits away.
Use Automatic Bowl Cleaners: Drop-in tank tablets can continuously clean your toilet with every flush, keeping stains and bacteria growth in check. Choose a cleaner compatible with your toilet components to avoid any potential damage.
Address Plumbing Issues: Rust stains often indicate corroding pipes or fixtures. Inspect your plumbing for any signs of rust and replace parts as necessary. This not only prevents stains but also protects your home’s plumbing integrity.
Flush Regularly: Even unused toilets should be flushed regularly to prevent stagnant water from staining. This is particularly important for guest bathrooms or any toilet that doesn’t see daily use.
Vinegar Flushes: Occasionally flushing your toilet with vinegar can help neutralise pH levels and dissolve beginning mineral deposits before they become visible stains.
DCM Plumbing: Your Ultimate Plumbing Solution
If you’ve tried every method and still find yourself battling persistent toilet bowl stains, it might be time to call in the experts. DCM Plumbing specialises in comprehensive toilet plumbing solutions, including toilet maintenance and repairs.
DCM Plumbing and Drainage are members of the Master Plumbers Association of Queensland and fully licensed with QBCC (Queensland Building and Construction Commission) to carry out all repairs and replacements for toilets.
For complete peace of mind and fast, courteous service, call DCM Plumbing and Drainage on (07) 5576 5305.
Does your toilet start bubbling when the shower is running? It might seem like a minor annoyance, however, this often signals an underlying plumbing issue that shouldn’t be ignored. Bubbling in the toilet could point to problems like blockages, pressure imbalances, or even issues within your main sewer line.
Left unresolved, these plumbing complications can lead to larger concerns such as slow drainage, persistent odours, or, in worst-case scenarios, a full-blown sewer backup. Understanding the cause and knowing how to address the issue is essential for preventing costly damage and restoring harmony to your plumbing system.
What Does a Bubbling Toilet Mean?
A bubbling toilet occurs when air is forced into the toilet bowl, creating a gurgling or bubbling effect. This often happens when the shower is running, as both fixtures are connected to the same drainage system. The bubbling indicates that something is disrupting the normal flow of water and air in the plumbing pipes.
Usually, water and waste travel smoothly through the pipes, with air venting out via the plumbing system’s vent stack. However, when there’s a blockage, restriction, or improper airflow in the system, air can become trapped. As water from the shower flows through the pipes, it pushes the trapped air toward the nearest escape point (your toilet bowl).
This indicates a red flag for potential plumbing problems. If left unresolved, the issue can escalate into more severe concerns, such as slow drainage, frequent clogs, foul odours, or even sewage backups into your home.
Common Causes of a Bubbling Toilet
Clogged Drain Line
A clogged drain line is one of the primary culprits behind a bubbling toilet. When the drain line shared by your shower and toilet becomes partially or fully blocked, the water flowing from the shower struggles to pass through. This creates a buildup of air pressure in the pipes, forcing air to escape through the toilet bowl.
Blocked Vent Pipe
The vent pipe in your plumbing system plays a crucial role in balancing air pressure. It allows air to escape from the drainage system and ensures that water flows freely through the pipes. However, if the vent pipe becomes blocked by things such as debris, leaves, or even bird nests, it can create negative pressure in the plumbing system.This negative pressure prevents proper air circulation, causing air to get trapped in the pipes.
Partially Blocked Main Sewer Line
A partial blockage in the main sewer line can also cause your toilet to bubble when the shower is in use. The main sewer line is responsible for carrying wastewater from your home to the Council sewer or septic tank. If there’s a blockage in this critical line caused by tree roots, grease, or deteriorating pipes it restricts the flow of water and creates pressure imbalances throughout the plumbing system.
In this instance, you might also notice additional symptoms, such as slow drainage in sinks and bathtubs, gurgling noises in other fixtures, or foul sewer odours in your home.
Plumbing Configuration Issues
Sometimes, the issue stems from the plumbing system’s design. Poorly configured plumbing systems, such as improperly sloped pipes, insufficient venting, or incorrect connections between fixtures, can disrupt the flow of water and air. These design flaws can lead to recurring problems like bubbling toilets, slow drainage, and frequent blockages.
Other Signs to Look Out for
Multiple Fixtures Draining Slowly
If you notice that not just your toilet, but also sinks, bathtubs, and showers are draining slowly, it’s a sign that there’s a blockage or restriction in your plumbing system. This is particularly concerning if the issue affects multiple fixtures at once, as it often points to a partial blockage in the main sewer line or shared drain pipes.
Persistent Foul Odours Coming from Drains or the Toilet
Unpleasant smells coming from your toilet or drains can be an indication of sewer gas escaping into your home. This can occur when there’s a blockage or damage to the vent pipe, or if wastewater is sitting stagnant in your plumbing system due to slow drainage or backups.
Water Backing Up into Sinks or Tubs When Other Fixtures Are Used
A clear red flag of a plumbing issue is when water starts backing up into one fixture when another is in use. For example, you might notice dirty water pooling in your bathtub or sink when you flush the toilet or run the shower. This usually suggests a clog or obstruction in the drain line that’s forcing water to flow back instead of out.
Sewage or Dirty Water Spilling from Drains
Perhaps the most alarming sign of a serious plumbing problem is the sight of sewage or dirty water spilling out of drains, toilets, or other fixtures. This typically happens when a severe blockage prevents wastewater from exiting your home, causing it to back up and overflow. This type of issue requires urgent professional intervention to prevent further damage and potential health risks.
What to Do If You Notice These Signs
If you’re experiencing any of these symptoms alongside a bubbling toilet, it’s crucial to address the issue promptly. Ignoring these signs can lead to extensive water damage, costly repairs, and unsanitary conditions in your home. In most cases, the expertise of a licensed plumber is needed to diagnose and resolve the root cause effectively.
How DCM Plumbing Can Help
DCM Plumbing is your trusted Gold Coast plumber for resolving bubbling toilets and other plumbing issues. With our free drain camera inspections, our team identifies problems like blocked vents, clogged drains, or obstructed sewer lines with precision. We provide professional services to restore your plumbing system to optimal condition. With licensed plumbers, decades of experience, and top-notch customer service, we’re here to help. Contact DCM Plumbing today for fast, reliable assistance!
Have you ever turned on your shower expecting a soothing, steady stream of warm water but instead were greeted with barely a dribble? As professional plumbers, we know that low water pressure can be a nuisance and understanding the causes and how to increase the water pressure in your house can make all the difference. This guide covers common causes of low water pressure, how to diagnose the problem, effective fixes, and tips to maintain optimal water pressure.
Causes of Low Water Pressure
Low water pressure can be caused by a range of issues, from plumbing problems to external factors. Understanding these causes is the first step toward resolving the issue.
- Clogged or Corroded Pipes
Over time, mineral deposits, rust, and debris can accumulate inside pipes, restricting water flow. Areas with hard water are particularly prone to this issue as the minerals in the water accelerate build-up. - Leaky Pipes
Even small leaks can lower pressure at your taps and fixtures. Leaks often occur in hidden areas like walls or underground, making them harder to detect. Find out more about how to find a water leak underground. - Undersized Pipes
Homes with outdated plumbing may have pipes that are too small to handle modern water demand, especially when people are using multiple fixtures at once. - High Water Demand
Using excessive amounts of water can strain your plumbing system, leading to a noticeable drop in pressure, even if you do have modern pipes. - Closed or Partially Closed Valves
There is a main water shut-off valve that provides water to the house and often the fixtures themselves have their own valves that control the flow of water from the fixture. If these valves are not fully open, they can restrict water flow and cause the water pressure to drop. - Faulty Pressure Regulator
A pressure regulator maintains consistent water pressure. If it malfunctions, you may experience either excessively low or inconsistent pressure. - Sediment Build-Up in Your Water Heater
Sediment can build up over time in your water heater, impeding the flow of water. This can lead to low hot water pressure specifically. This is why it’s important to service your hot water system. - Council Supply Issues
Sometimes, the issue lies outside your home. Maintenance work, leaks in the Council’s supply, or high demand in your area can result in temporary drops in water pressure. - Elevation or Gravity
Homes located on hills or higher floors of buildings often experience lower pressure due to gravity reducing the flow from the main supply.
How to Determine the Problem
To fix low water pressure effectively, you need to identify the root cause. Follow these steps to pinpoint the problem:
- Inspect Visible Pipes and Fixtures
Look for signs of leaks, corrosion, or mineral build-up on exposed pipes and fixtures. Discoloured water or reduced flow from a single fixture often indicates a clog or damage. Remember that the leak may be underground. - Check the Water Meter
Turn off all water using fixtures in your home and observe the water meter. If it continues to move, there’s likely a leak somewhere in your plumbing. Find out how to turn off the water to your house in 4 easy steps. - Test Individual Fixtures
If the pressure is low at a single tap or showerhead, the issue may be a blockage in that fixture. Remove aerators or showerheads to check for debris and lime scale. - Test the Pressure Regulator
Attach a pressure gauge to an outdoor tap and turn the tap on fully. If the reading is below 500 KPA, your regulator may need adjustment or replacement. - Consult Your Neighbours
If neighbours are also experiencing low pressure, it’s likely a Council supply issue. Contact your water supplier for updates or repairs. - Assess the Shut-Off Valve
Locate the main water valve, typically near the water meter, and ensure it’s fully open by turning it counterclockwise. - Inspect Your Hot Water System
Low hot water pressure can indicate sediment build-up in the tank. Check for leaks around the heater and flush the system to clear sediment. - Consider Elevation or Distance
If your home is on higher ground or far from the main supply, gravity or reduced flow over distance could be the culprit.
How to Increase Water Pressure
Once you’ve identified the cause, here’s how to repair the specific issue
- Clear Clogged Pipes
Unfortunately, clearing a water mains pipe is a big job, and you will need to call a professional. For severe mineral build-up, pipe replacement may be necessary. - Repair Leaks
Fix visible leaks using waterproof tape or pipe sealant as a temporary solution. For extensive repairs, you’ll need to contact a plumber to replace damaged sections. - Replace Corroded Pipes
Upgrading to modern materials like PVC or PEX can restore proper flow and pressure while preventing future corrosion. - Upgrade Undersized Pipes
Installing larger-diameter pipes ensures your plumbing system can handle modern water demand, especially during peak usage. This may be a costly solution, however. - Fully Open Valves
Check that all shut-off valves, including those at individual fixtures, are fully open to allow unrestricted water flow. - Adjust or Replace the Pressure Regulator
Use a wrench to adjust the regulator to a pressure level of 500KPA. If it’s faulty, replace it with a new one. The pressure regulator is an adjustable valve usually located at the water meter, and you can buy a new one from Bunnings. - Install Booster Pumps
Booster pumps are ideal for homes at higher elevations or far from the Council supply. These pumps increase water flow and pressure throughout your system. - Flush the Water Heater
Drain the tank to remove sediment build-up that may be restricting flow. Refill and test for improved hot water pressure. You can also contact a professional to do a full service of your hot water system.
Address Council Supply Issues
Report any problems to your water supplier and inquire about potential solutions or repairs in your area.
How to Prevent Low Water Pressure from Happening Again
Preventative maintenance can help you avoid future pressure issues. Here’s how:
- Install a Water Softener
In areas with hard water, a water softener reduces mineral deposits and prevents build-up in pipes and fixtures. - Schedule Regular Plumbing Inspections
A professional plumbing inspection can identify and address issues like corrosion, leaks, or blockages before they cause pressure drops. - Replace Aging Pipes Proactively
Don’t wait for pipes to fail. Gradually replace old pipes with modern materials to ensure long-term efficiency. - Clean Fixtures Regularly
Keep an eye on your fixtures and soak aerators and showerheads in vinegar to dissolve lime scale and improve water flow. - Stagger Water Usage
Avoid running multiple water-intensive appliances, like washing machines and dishwashers, at the same time. - Monitor Pressure with a Gauge
Install a pressure gauge on your plumbing system to track fluctuations and act quickly if pressure drops. - Flush the Water Heater Annually
Prevent sediment build-up and maintain consistent hot water pressure by flushing and servicing your hot water system regularly.
Restore Your Home’s Water Pressure Today
Low water pressure can be frustrating, but with the right approach, it’s often a fixable issue. From identifying the cause to implementing practical solutions and preventative measures, taking action can restore your water flow and improve your daily routine. If you’re dealing with persistent low water pressure, DCM Plumbing is here to help with expert diagnosis and reliable repairs. Contact us today for professional support and peace of mind.
Stormwater drainage systems manage rainfall runoff and protect properties, public spaces, and the environment from flooding and water damage. Understanding who is responsible for stormwater drains in Queensland ensures they remain effective, minimising costly repairs and environmental harm. In this blog, we outline the roles of property owners and local councils in maintaining stormwater drains, and provide practical maintenance tips for when issues arise.
Key Take Aways
Property owners are responsible for maintaining stormwater drains and pipes within the boundaries of their property.
Local councils manage stormwater infrastructure beyond private boundaries, including kerbs, gutters, and public drainage systems.
Yes, you may be fined if your property’s stormwater system causes flooding, erosion, or discharges unlawfully onto neighbouring land.
In most cases, yes. Any major changes to how stormwater is collected or discharged may require council approval and compliance with local regulations.
How Stormwater Drainage Systems Work
Stormwater is rainwater that runs off rooftops, driveways, and roads, flowing into stormwater drains. These drains connect to a larger drainage network managed by local councils, directing water into nearby waterways. Unlike sewage systems, stormwater does not undergo treatment before discharge.
Stormwater systems typically consist of three components:
- Roof drainage: Collects water from building roofs.
- Surface drainage: Manages water runoff from roads, driveways, and landscaped areas.
- Subsoil drainage: Prevents waterlogging in soil beneath the surface.
Key collection points include kerbs, stormwater pits, and rubble pits. Proper maintenance is vital to ensure efficient drainage and prevent flooding.
Responsibilities for Stormwater Drains in Queensland
Property Owners
- On-site systems: Property owners are responsible for maintaining drains on their property up to the connection point with council-managed systems. This includes gutters, downpipes, and private stormwater drains.
- Maintenance: Regularly inspect and clear debris from gutters, downpipes, and drains to prevent blockages. Ensure stormwater isn’t redirected onto neighbouring properties or into sewage systems. Find out more in our blog on how to prevent your stormwater drain from clogging or how to unblock a storm drain.
Local Councils
- Public infrastructure: Councils manage stormwater systems located on public property, such as streets, parks, and waterways. Their duties include regular cleaning, repairs, and upgrades to accommodate urban development and extreme weather events.
- Reporting issues: Residents can report blockages or damage to public stormwater drains for council action.
Contact information:
If you live outside of these areas, please look for your local councils stormwater drain policies.
Why Regular Maintenance Matters
Neglecting stormwater systems can lead to:
- Flooding
- Structural issues such as cracks in walls, uneven flooring, and more
- Pests and mould
- Environmental damage such as soil erosion and water pollution
Tips for Maintaining Stormwater Drains
- Regularly remove leaves, dirt, and other obstructions from gutters and drains, especially during storm seasons.
- Look for signs of damage or blockages, such as slow water flow, pooling water, or unpleasant odours.
- Hire plumbers to clean stormwater systems twice a year using high-pressure jets or CCTV cameras to detect and remove stubborn blockages.
- Address any cracks or damage in stormwater pipes to prevent escalation.
What to Do if Issues Arise
If you experience persistent drainage problems, consider:
- For private stormwater systems, professional plumbers can resolve stormwater drain blockages and provide long-term solutions.
- Report problems with public stormwater drains, such as damage or overflow, to your local council.
Stormwater Drainage Solutions with DCM Plumbing
DCM Plumbing is your trusted partner in all things stormwater drains, with over 37 years of experience and 1300+ 5-star reviews. Whether you need assistance clearing a blocked stormwater drain or repairing a damaged system, our team is here to provide expert service. Contact us today to ensure your property stays protected, no matter the weather.
Dealing with a blocked toilet can be inconvenient, especially when you don’t have a plunger handy. Luckily, there are plenty of effective DIY methods to unblock a toilet without a plunger using simple household items like dish soap, baking soda, vinegar, or even a wire coat hanger. This blog outlines step-by-step solutions to help you get your toilet back in working order without needing specialised tools. Of course, if the blockage is stubborn or you prefer professional help, DCM Plumbing is here to help. As trusted Gold Coast plumbers with over 37 years of experience and 1300+ 5-star reviews, you can rely on us 24/7 to solve your plumbing problems quickly and efficiently. Call us today.
How to Unclog Your Toilet Without a Plunger
1. Dish Soap and Hot Water
- Steps:
- Pour a generous amount of dish soap into the toilet bowl to lubricate and help break down the clog.
- Carefully add a bucket of warm (not boiling) water.
- Wait for a few minutes, then flush to see if the blockage clears. Repeat if needed.
- Tip: The dish soap’s lubricating properties help the clog move along the pipes smoothly.
2. Baking Soda and Vinegar
- Steps:
- Pour one cup of baking soda into the toilet bowl, followed by one to two cups of vinegar.
- Let the chemical reaction play out and then let it sit for about 30 minutes.
- Flush to check if the blockage has cleared.
- Tip: This method is eco-friendly and effective for lighter clogs.
3. Hot Water Only
- Steps:
- Boil water, then let it cool slightly, especially if your toilet has plastic parts to avoid damage.
- Carefully pour the hot water into the bowl from waist height to add force.
- Wait a few minutes, then flush. Repeat if necessary.
- Tip: This works well for minor blockages caused by toilet paper build-up.
4. Epsom Salts or Bath Bombs
- Steps:
- Drop one cup of Epsom salts or a bath bomb into the toilet bowl.
- Allow it to dissolve and fizz for 15–20 minutes.
- Pour in hot water and flush.
- Tip: Epsom salts’ bubbling reaction can help break down clogs more effectively than regular salt.
5. Toilet Brush (in Public Restrooms)
- Steps:
- Use the brush to poke and loosen the clog gently.
- Use small circular motions to break up the clog and avoid compacting it further.
- Tip: Only use this in emergencies in public toilets where no other options are available.
6. DIY Pseudo-Plunger (Plastic Bottle Method)
- Steps:
- Fill a large plastic bottle with warm water.
- Put on some dish gloves (you might have to throw these away after)!
- Place your thumb over the bottle’s opening, position it as close as you can to the outlet, and release your thumb while squeezing the bottle forcefully.
- Tip: This method can mimic a plunger’s effect, creating pressure to dislodge stubborn clogs, but may involve your hands getting dirty – literally!
7. Wire Coat Hanger
- Steps:
- Straighten a wire hanger, creating a small hook at one end.
- Insert it into the toilet, gently working it around to break up the blockage.
- Run some water to check for success.
- Caution: Be gentle to avoid scratching the porcelain or pushing the clog further down.
By using these simple tools and household items, you can tackle most clogs without a plunger. If these methods fail, it may be best to call a professional plumber to prevent further damage.
Need Help? Contact DCM Today
While DIY methods can effectively clear minor toilet blockages, stubborn clogs or recurring drainage issues may require professional attention. At DCM Plumbing, we have the expertise and tools to diagnose and resolve complex plumbing problems, ensuring your toilet operates smoothly.
Ignoring persistent blockages can lead to larger issues, such as burst pipes or overflowing water. Acting quickly saves you from costly repairs and prevents further inconvenience. Contact DCM Plumbing today for peace of mind and a fast fix to your plumbing concerns!
Finding out how to unblock a stormwater drain is a smart move if you suspect you have blocked stormwater pipes on or around your property.
A stormwater drainage system in your property consists of gutters, downpipes and stormwater drainage pits. Altogether, this system collects rainwater and sends it to the stormwater drainage network in your street or area, which is governed by your local council.
In this article, we tell you why you have a blocked stormwater drain, how to unblock it, and how you can prevent future occurrences. Have a blocked drain inside the house instead? Read our blog on how to clear a blocked drain.
How Do I Detect Blocked Stormwater Pipes?
There are a bunch of signs that indicate your stormwater drainage system is blocked, some more obvious than others. A few of them include:
- Overflowing roof gutters would mean your downpipes or underground pipework could be blocked
- Water pooling or boggy areas in your backyard means water isn’t escaping into the drainage system, so there could be a blockage or just inadequate stormwater drainage for the volume of water
- Water overflowing from the base of your downpipes indicates a blockage in the stormwater system
Once your stormwater drain or pipe gets blocked, it tends to overflow quickly. This is because stormwater drains usually handle a large amount of water. As such, blocked stormwater pipes can cause serious problems, including:
- Damage to your property and surroundings: A blocked gutter can cause water to flow into your house. It can pass under doors and damage your floors.
- Mild health risks: Rainwater that sits around may attract more mosquito breeding or lead to algae growth which can become a slip hazard. If rain cannot get into your stormwater drainage system, water can back up onto your roof, which in turn leads to leaks into your home and possible mould growth.
Therefore, it is essential to ensure that you do all you can to prevent a stormwater drain blockage. This will save your home from a possible flood and the resulting damages that come with it. If you notice a stormwater drainage issue on public land, report it to the Gold Coast Council today.
Let’s look at some things that can cause a blocked stormwater drain.
What Causes Blocked Stormwater Pipes?
There are various causes of blocked stormwater pipes which include:
Thirsty Trees
The number one cause of blocked stormwater pipes is root intrusion from plants and trees. During the long dry winters, roots go looking for sources of water and often find their way into the drainage system. They can grow into the drains for many months, sometimes years, before a problem is noticed, slowly but surely preparing to wreak havoc.
We recommend an annual CCTV drain camera inspection of your stormwater system to ensure it’s not compromised during heavy downpours in the summer months.
Damaged Stormwater Pipes
The second most common cause of blockages is crushed or broken stormwater pipes. As stormwater drainage isn’t laid very deep in the ground, it is possible as the ground compacts and vehicles drive over it that the stormwater pipes become compressed and broken.
ORGANIC Matter
This includes materials like leaves, dirt, sand, sticks, small pebbles, mulch and bark from the garden. Water picks up anything in its path and takes it down grates and pipes, especially during storm season. There, these materials will accumulate and, with time, cause a blockage.
After heavy rainfall, you should check your stormwater drains. This is to ensure that any organic matter that might have been swept down there is spotted early and cleared out before it becomes a problem.
Rubbish and Debris
If you do not dispose of your rubbish properly, it can cause a stormwater blockage. Rubbish lying around your stormwater drains can be carried by the rain into your stormwater pipes, and this can cause blockages.
Incorrect Connection
If your stormwater pipes are not correctly connected, then expect to have stormwater drains that are blocked constantly. If you discover that the stormwater pipe on your property is improperly connected, contact a good plumber immediately.
Often stormwater pipes have not been connected to anything and just come to an end in the ground which can lead to blockages. Occasionally stormwater pipes have been connected into the sewer which is actually illegal and needs to be rectified by a plumbing and drainage expert immediately.
These are the major causes of stormwater drain blockages. But how can these blockages be prevented?
How Do I Prevent Blocked Stormwater Pipes?
The common saying that “prevention is better than cure” is true and definitely also applies to stormwater blockages. It’s better to prevent clogging of your stormwater pipes than to begin clearing blocked stormwater pipes.
Prevention is cost-effective, less stressful, and safer for you, your environment, and your pipes. So, here are some ways to prevent your stormwater drain from blockage.
Regular Cleaning
You should have your drains cleared out by a storm drain cleaning service at least once a year. They will rid your drain of debris and other materials that have built up over time.
This way, you can efficiently ensure that a complete blockage does not occur. It is a good method that will save you money and effort.
Allow a Professional To Do Your Plumbing
You should only let a licensed plumber carry out the installation and maintenance of your household stormwater pipes.
Don’t try to do it yourself! Use an experienced professional with many years of drainage solution experience to ensure you will get a quality result. You don’t want to be revisiting these stormwater issues every year or risk making everything worse.
Recognise the Warning Signs
It is always better to detect a blocked stormwater drain early. When this happens, it will prevent more drastic damages from occurring.
Certain warning signs tell you that your stormwater drain is about to block up or is blocked. These signs include:
- Water gushing out of your downpipes or roof gutters
- Flooded grates during downpours
- Slowly draining water
- Flooded property
Contact a professional plumber to check out your stormwater drain when you notice any of these signs. Clearing blocked stormwater pipes early will prevent further damage, saving you time and money.
Have Gutter Guards and Stormwater Grates
Guards and grates are an excellent way to prevent blockages. When you install them, they are there to stop debris and leaves from entering the drain. Clean the guards and grates regularly, so the debris does not accumulate.
Also have your gutters vacuum cleaned by a professional at least once a year and more frequently if you have a lot of shedding trees close to your property.
Plan the Structure of Your Property Carefully
If, for instance, you plan to have a garden on your property, be intentional about where you plant the trees on your property.
Since tree roots and leaves can cause stormwater drain blockages, ensure that you plant trees a reasonable distance away from your stormwater pipes.
How Can I Go About Clearing Blocked Stormwater Pipes?
There are natural, chemical, and technical ways of unblocking blocked drains and pipes. However, if your stormwater drain is blocked, the best thing to do is contact a plumbing and drainage expert to help you unblock the pipes.
It is not advisable to try to unclog your blocked stormwater drains by yourself. This is because, unlike other drainage systems, stormwater drains connect pipes from the roof to channels that then discharge water into the water table or kerb in the street.
It can be challenging to know how to unblock a stormwater drain yourself, so you will need to contact a professional.
DCM Plumbing and Drainage offers storm drain cleaning services on the Gold Coast that are perfect for every stormwater drain situation. Using the best tools, we will get rid of dirt, leaves and debris from your stormwater drains. We will succeed in clearing your drains in situations where other conventional methods won’t work.
Is your stormwater drain blocked on the Gold Coast? Don’t hesitate, call us at (07) 5576 5305 or contact us online and book your expert plumber today.
Water leaks, whether small or large, can cause significant damage to your home, from mould growth and damp walls to structural damage. Additionally, a continuous leak can increase your water bills, wasting both water and money. This article will walk you through some common causes of a leaking shower and give you practical tips on how to fix a leaking shower.
Signs That Your Shower Is Leaking
If you’re not 100% sure if your shower is leaking or not, here are several warning signs to look for:
- Water Pooling Around the Base of the Shower:
If you notice puddles of water forming around your shower tray, especially after use, it’s a clear indication that water is escaping from where it shouldn’t. - Water Stains on the Ceiling Below the Bathroom:
If the shower is located on an upper floor, leaks can manifest as water stains on the ceiling below. These stains may appear discoloured and grow larger over time. - Loose Tiles or Damp Walls Near the Shower:
Water that seeps behind tiles or into walls can loosen them over time. If tiles near your shower feel loose or you notice damp spots on nearby walls, it could signal a leak. - Mould Growth in Unexpected Areas:
Mould thrives in damp environments, so if you start seeing mould growth in areas outside your shower, like on walls, ceilings, or floors, this could be a sign of excess moisture due to a leak. - Higher Than Normal Water Bills:
A sudden increase in your water bill, without an obvious reason, might be due to a leak. Even a slow, unnoticed drip from your shower can significantly impact your water usage over time.
Common Causes of a Leaking Shower
Worn-out or Damaged Seals and Grout
Over time, the seals and grout around your shower tray and walls can deteriorate or crack, allowing water to escape. As water seeps through these gaps, it can cause damage to your bathroom’s flooring and walls, potentially leading to mould and rot if not fixed.
Failed Waterproofing
All Aussie showers are waterproofed before they are installed. Over time, this membrane can break down or fail, allowing water to seep underneath the tiles. Once water gets through, it can cause significant damage to the wood or plasterboard surrounding the shower. Failed waterproofing often leads to unseen water damage, which can compromise the structural integrity of your bathroom. This is one of the most common reasons for a leaking shower.
Loose or Damaged Shower Head
A poorly secured or damaged shower head can lead to a constant drip, even when the shower is turned off. This might seem like a minor issue, but over time, the amount of wasted water adds up and can increase your water bills.
Faulty Shower Valve
If your shower valve isn’t functioning correctly, it can cause leaks behind the wall. These leaks are particularly troublesome because they aren’t always immediately visible, potentially leading to hidden water damage.
Leaking Pipes
Older or damaged pipes that supply water to your shower can cause concealed leaks. These leaks may not be immediately visible but can cause significant structural damage to your bathroom and home over time. Detecting and fixing pipe leaks often requires a professional plumber.
Cracked Shower Tray
A cracked or damaged shower tray can lead to water seeping through to the floor below. Over time, these cracks can worsen, making the leak more severe. Regularly inspecting your shower tray for cracks and damage can help catch these issues early and prevent water damage to your bathroom flooring.
Fixing your a leaking shower
Resealing the Shower
To fix the silicone or caulking around the edges of the shower tray and walls from wearing out or cracking, remove the old sealant with a scraper and reapply a new layer of silicone or waterproof caulk around the shower tray, corners, and any visible gaps. Ensure that the area is dry before applying the new sealant and give it ample time to cure.
Failed Waterproofing
If the waterproofing in your shower has failed, there are two options:
- Rip Out and Replace Shower: This involves removing the entire shower area, installing a new waterproof membrane, and retiling.
- Shower Resealing: A more affordable solution, where a company reseals the shower without a full renovation. However, this is often a band aid solution to buy a little extra time but won’t be as long lasting as a full replacement.
Replacing the Showerhead
Start by tightening any loose connections. If this doesn’t resolve the issue, inspect the showerhead for wear and tear. Replacing a faulty shower head is straightforward and can stop further leaks. Check our step by step guide on How to change your shower head
Fixing the Shower Valve
A faulty shower valve, which controls water flow, can lead to hidden leaks behind the wall, which can cause serious damage if left untreated. Fixing or replacing a malfunctioning valve often requires professional assistance. If you suspect this might be the cause of your leaking shower, it’s best to call a plumber to assess the valve and carry out necessary repairs or replacements.
Repairing Cracks in the Shower Tray
For small cracks, you may be able to use a shower tray repair kit that contains waterproof resin to fill in and seal the crack. However, for larger or multiple cracks, the shower tray might need to be replaced entirely. In such cases, professional help is recommended to ensure the new tray is installed properly and to avoid further damage.
When to Call a Professional
While DIY solutions can tackle minor shower leaks, more complex problems—e.g. leaks behind walls, faulty shower valves, or damaged pipes—should always be handled by a licensed plumber. DCM Plumbing has the latest thermal imaging camera technology to help detect those hidden leaks and the skills and expertise to fix it.
DCM Plumbing ensures the problem is properly diagnosed and fixed at the source, preventing costly repairs down the line. If you notice persistent leaks, water stains, or increasing water bills, it’s important to act fast to avoid long-term damage. Our team can quickly identify and resolve the issue, giving you peace of mind. Contact us today!
Storm drains play a vital role in preventing rainwater from pooling and flooding your property. Unfortunately, many Australian property owners aren’t very familiar with storm drains and how they work, or more importantly, how to maintain them and how to prevent storm drains from clogging. This can be a serious problem, especially during storm season and with a 4th La Niña in 5 years predicted in Australia for 2024, the effects might be even worse.
Properly maintaining your storm drains will help to protect your property by making sure water is safely and effectively channelled away from your home and into a drainage system. Bad storms like those of the 2022 season can cost the Australian economy billions of dollars, not to mention the personal suffering they can induce. In this storm drain guide, we cover everything you need to know to keep them clog-free and function as they should.
At DCM Plumbing, our Gold Coast plumbers are fully qualified, insured and ready to respond to all of your plumbing needs. We have extensive knowledge and experience within the industry and can get to you fast, so if you need help with blocked stormwater drains, contact us immediately. Got a blocked drain? Read our blog on how to clear a blocked drain.
What Is La Niña?
La Niña is an atmospheric and oceanic phenomenon serving as the wet counterpart to El Niño. During a La Niña year like the one the BOM has predicted for 2024, the waters of the equatorial Pacific cool, sparking widespread changes in weather conditions and patterns. Here in Australia, this usually results in torrential rains and storms, greatly increasing the risk of floods. With this year being the 4th official La Niña in 5 years, it is set to be a historical storm season that could see floods across the entire east coast of Australia – so make sure you’re prepared!
When Is Storm Season in Queensland?
According to the Queensland Government, storm season is from October to April. They state that it is vital that you remain vigilant and prepare for storm season. Queensland is the most disaster-prone state in Australia and so these government warnings should not be taken lightly, and that’s why we recommend staying on top of your stormwater drain maintenance to avoid any unnecessary flooding!
What is a Stormwater Drain?
Without storm drains, rain flowing from roofs, through gutters, downpipes and along driveways would simply collect and eventually flood a property or area. But, what exactly is a storm drain?
A storm drain, or stormwater drain, is a type of drain that is designed to remove excess rainwater from roads, pavements, car parks, etc. As such, storm drains are an integral aspect of property drainage and flood prevention. Storm drains are usually not metallic and are made of concrete, PVC, vitrified clay, precast cement, or brick.
How Does a Stormwater Drain Work?
There are two primary types of storm drain systems – local and civil drain systems.
Local Drainage
Most properties need ways to deal with rainfall so that they don’t flood every time it rains! This typically involves channelling the water to down pipes which then join stormwater pipes, where it can be discharged effectively. Local drainage is usually done through simple methods such as gutters, landscaping, drainage pits etc. It may also require facilities with which to temporarily store excess water (on-site detention systems or OSDs) to prevent the overload of civil drains (local creeks, watercourses etc).
Civil Drainage
Civil drainage is larger scale and involves taking runoff stormwater from densely populated areas and slowly releasing it back into nature. Often, these systems will use naturally occurring features such as oceans or lakes as the end disposal location of the stormwater.
How Does a Storm Drain Become Clogged?
Learning how to maintain your pipes for storm season will help keep your property safe and dry. While plumbing skills are typically not needed, at least not initially, knowing where your storm drains are and keeping them maintained and free of debris will go a long way in protecting your home. Here are a few things to look out for to keep your property safe and ready for storm season, and be sure to contact us today if you need help with blocked stormwater drains.
Collapsed pipework
Collapsed or crushed pipework is a common cause of blocked stormwater drains. It can be caused by deterioration over time or ground movement – a vital reason why checking your stormwater drains regularly can save you a lot of stress in the long run. Better to spot any deterioration early!
Natural Debris
Stormwater drainage can become clogged by many things, but one of the most common causes of clogging is natural debris. Leaves, twigs, branches, rocks, sand, dirt and even grass clippings can all build up and block stormwater drains. If this occurs, water will not be able to drain properly and may potentially flood the area.
Tree Roots
Tree roots are another common cause of stormwater drain clogs. They are able to grow right through certain drain pipes in search of water. As the roots grow over time, they can become big enough to completely clog the drainage system.
If you notice any serious issues with your storm drains and you live in the Gold Coast area, contact us today. We have years of experience in dealing with storm drains and can make sure that your drains are working as they should.
Signs and Consequences of a Clogged Storm Drain
When a storm drain becomes clogged or blocked by debris, water will no longer be able to properly drain away from your property, which can cause flooding and severe damage to your home or property. Some of the costly signs and consequences of a clogged storm drain include:
- Basement and/or ground floor flooding
- Water damage
- Structural damage
- Mould damage
- Damaged lawn and landscaping
How to Prepare for Storm Season in Queensland
If you want to know how to prepare your stormwater drainage system for storm season in Queensland, check out our blog on how to unblock stormwater drains. Here’s a brief recap:
- Clean your drains regularly
- Recognise the warning signs of a clogged storm drain
- Have gutter guards and stormwater grates installed
- Plan the structure of your property carefully (don’t obstruct drainage areas)
- Allow a professional to do your plumbing
Choose DCM Plumbing for Your Storm Drain Maintenance Needs
While you can’t see a storm drain, you’ll notice it when it backs up as your property will start flooding. The only visible points are where it exits your property into the street or a drainage pit, which may be council owned or on your property, and it’s important to employ good storm drain maintenance practices to keep these points clear of debris.
If you notice water pooling in your yard, you may have a blocked stormwater drain. We help people clear blocked stormwater drains and can also add extra drainage and stormwater pits to increase the speed at which rain from heavy downpours can get into the main stormwater drainage system. This means flooding is less likely to occur on your property! So, to avoid costly water and property damage, contact us today.
DCM Plumbing are family run team of professional plumbers. Our team is dedicated to supplying a professional plumbing and drainage service throughout the Gold Coast. We have been servicing residential and commercial properties since 2002 within Burleigh Heads and throughout the Gold Coast region.
- About Us
- Why Choose Us
- Meet Our Team
- Locations
- FAQ’s
- Who We Work With
- Residential
- Commercial
- Real Estates / Body Corporates / Strata Managers
- Builders
- Resources
- How to unclog toilet
- How to make water leak insurance claim
- How to get rid of drain flies
- How to turn off water to your house


Google Rating
Based on 1531 reviews